
The microscope diaphragm is a crucial yet often overlooked component in microscopy. It is what stands between you and crystal clear images of your specimens.

Whether you’re an experienced scientist or just starting out in the world of microscopic exploration, mastering this part of the microscope can make all the difference to your viewing experience.
In a light microscope, the diaphragm found beneath the stage controls both the shape and amount of light that passes through the specimen toward the eyepiece, and comes in the form of an iris or disc. A simpler disc diaphragm is a rotating disc with different size circular holes in it. The more complex iris diaphragm made up of overlapping metal blades works like the eye or aperture of a camera lens.

The condenser aperture diaphragm is more than just an accessory in your microscope. It’s a pivotal tool that takes charge of contrast, depth-of-field, and resolution – three elements that can make or break your microscopic examination.
Path of Light in the Microscope
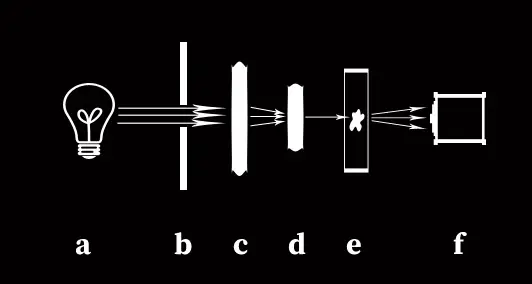
The diagram above illustrates what happens in a typical light microscope. The light from light source (a) travels through the opening in the diaphragm (b), then is converged by one lens (c) in the condenser and focused by a second lens (d) onto your sample. The light then travels through your sample (e) to your chosen microscope objective (f).
Contrast Control through Diaphragm
An open wide setting lets abundant light flow into the system while a narrow one restricts its entry, thereby increasing contrast between different structures within the viewfield. So next time when peering down the lens, remember – wider isn’t always better, especially if you’re aiming for high contrast.
Depth-of-Field Adjustment Using The Microscope Diaphragm
Apart from managing contrast, diaphragms also play a vital role in determining the depth of field (DOF), i.e., the range in which objects appear sharp and clear under magnification. This becomes particularly useful when focusing microscopes on specific layers or areas within specimens, depending on their nature and complexity.
You can increase the depth of field much like in a camera by reducing the numerical aperture (stopping down), which also increases contrast, but this reduces your resolution.
How To Optimize Resolution With Your Microscope’s Diaphragm
Last but certainly not least among the functions performed by the microscope’s primary aperture lies the influence over resolution- the detail level at which individual components are distinguished from each other during observation sessions using higher total magnification levels. Adjusting the size affects the amount of light entering the system, hence impacting the clarity of captured images.

To maximize without compromising brightness too much, the optimal position is usually found somewhere midway along the adjustment scale. However, the exact point varies depending on the type of specimen being examined and the conditions present inside the viewing chamber itself. Therefore, it requires practice and experience to determine the best settings for the unique situation encountered.
Closing the Diaphragm to Enhance Focus
To enhance focus when observing highly transparent specimens, you may need to close or partially close your condenser’s diaphragm. This action reduces angular aperture and increases contrast by limiting peripheral rays from reaching the objective lens.
This technique is particularly useful with disc diaphragms found on basic microscope models where it can significantly improve image clarity for detailed observations. However, remember not to completely shut off light as this would make viewing impossible.
Compensating for Light Loss by Increasing Intensity
In situations where closing down your field diaphragm results in too much loss of illumination – making observation difficult – there’s a solution: increase lamp intensity. The goal here isn’t necessarily brightness but rather ensuring optimal visibility without compromising resolution or causing glare.
A word of caution though – excessive lighting might cause damage both to observer’s eyes and delicate samples under study over time if not managed properly.
Balancing Image Brightness and Resolution
When observing highly transparent specimens under advanced microscopes, the balance between image brightness and resolution becomes critical. When you open up your diaphragm, both brightness and resolution increase due to a wider angle of light cone reaching the front glass slide of your current objective lens.
Increase in Light Intensity: A Double-Edged Sword?
An opened aperture diaphragm allows more light to enter. This results in increased illumination which is beneficial when focusing microscopes on darker images that require more visibility. This process involves adjusting various components such as condenser lens that converges the light towards specimen or disc diaphragms for controlling amount entering through it.
Risks Associated with Over-Illumination
You might think – “The brighter, the better”. However, overdoing it can actually be detrimental for obtaining clear visuals using a technical concept called numerical aperture.
A surplus amount of incoming rays may cause glare making final image less sharp despite seemingly clearer appearance initially. The field diaphragm controls how much area gets illuminated thereby influencing overall quality too.
Numerical Aperture & Lens Focuses Relationship Explained
The NA value indicated on your objective should match that set on your condenser for best results. It’s directly related with angular aperture i.e., maximum angle at which system can accept or emit light effectively impacting its resolving power greatly.
If not matched correctly according to their respective capacities like common 1.25x magnification having NA around 0.04 while high-end ones could go up to 1.0+. This mismatch could lead into decreased image quality despite seeming otherwise visually pleasing.
This complex interplay between different variables demonstrates why understanding each component’s function is crucial before starting any specimen viewing or measuring.

Matching Numerical Aperture for Optimal Resolution
Numerical aperture is essentially a measure of how much light an objective lens can gather from the specimen being observed. Numerical aperture, abbreviated as NA, is directly related to both the angular aperture and refractive index between your current objective lens and its medium (usually air or oil). The larger this value, the more detailed your final image will be.
The Role of Condenser in Matching Numerical Apertures
By adjusting the diaphragm appropriately based on your chosen objective’s numerical aperture value indicated usually right beside magnification power number, you ensure maximum possible detail capture without unnecessary loss due to misalignment.
This adjustment process might seem daunting at first but becomes intuitive with practice – just remember not to fully open up unless using advanced microscopes equipped with high-power objectives which require large amounts of light for effective functioning.
Finding Balance Between Light Intensity and Detail Capture
While having your diaphragms fully open increases brightness thus aiding visibility especially when observing highly transparent specimens; overdoing it may lead to reduced sharpness caused by excessive glare. Here lies another important role played by our trusty field diaphragm controls: they help us balance out intensity while maintaining desired level details captured within each frame viewed under the microscopes eye-piece.
Making Adjustments Based On Specimen Type And Objective Lens Used
- If working with low-magnification lenses such as 10x or less where depth-of-field isn’t a significant issue – keep the diaphragm slightly closed so only central portion gets illuminated leading to better contrast overall making features stand-out easily against background.
- For higher magnifications like 40x and above requiring thin section slides prepared avoiding overlapping layers – opening-up helps increase amount of light entering thereby improving clarity though one needs to compensate for potential losses via increasing lamp’s output accordingly if necessary.
Distinguishing Structures using Condenser Adjustment
One of the fundamental aspects of microscopy is discerning fine details in a specimen. This task becomes more manageable when you understand how to adjust your condenser effectively.
Fully Open vs Closed: A Balancing Act
A common misconception among beginners is that keeping their microscope’s diaphragm fully open will yield better images due to increased brightness. This assumption may not always be accurate.
An over-illuminated field may result in glare which reduces sharpness and detail especially if working with high numerical apertures where angular aperture plays a significant role. Conversely though too much closure (i.e., having your disc diaphgram nearly shut) might lead into diffraction patterns becoming visible thus affecting image clarity negatively despite potentially making certain elements stand out more clearly than before.
Finding balance between opening size for optimal illumination without causing unwanted effects such as glare or diffraction artifacts proves crucial here.
In our next section we’ll explore how different types specimens require varying settings for best viewing experience, a process often involving some trial-and-error until one finds most suitable setting per their needs without needing constant refocusing each time anew.
Finding Suitable Settings based On Specimen Type
Microscopy, especially when using advanced microscopes, requires precision and adaptability. The settings you choose can significantly affect the final image quality.
The Role of Diaphragms in Microscope Image Quality
A microscope’s diaphragm plays a critical role in focusing light on your specimen. Whether it is an iris diaphragm or disc diaphragm, its adjustment directly impacts how well you see your sample under the lens.
In particular, adjusting field diaphragms controls the amount of light entering through objective lenses. This feature becomes essential while observing highly transparent specimens where too much illumination could wash out important details.
Tailoring Your Approach to Different Specimens
Different types of samples may require different approaches for optimal viewing experience with a microscope. For instance,
- When dealing with bacterial cultures on glass slides, having disc or common diaphragms fully open might not yield best results as they are better viewed when these are closed due to their diffraction patterns becoming more visible.
- If you’re studying cells stained with dyes that fluoresce under certain wavelengths of light – condenser lens converges this focused beam onto them creating vibrant images even if iris diaphram opened only partially.
FAQs
What is a fact about the diaphragm of a microscope?
The diaphragm in a microscope regulates light intensity and contrast, directly influencing image quality.
What is the function of a diaphragm in a microscope?
A microscope’s diaphragm controls the amount of light reaching the specimen, impacting visibility, resolution, and depth perception.
What are the two types of diaphragms in a microscope?
The two main types are iris or disc diaphragms. Iris versions offer variable aperture sizes while disc ones have fixed openings.
What is diaphragm in simple microscope?
In simple microscopes, the diaphragm acts as an adjustable opening that controls illumination on your specimen for better viewing clarity.
Conclusion
Mastering the microscope diaphragm is importan in your microscopic exploration journey. It’s not just about turning knobs and adjusting light intensity, it’s about understanding its role in controlling contrast, depth of field, and resolution. The right balance between brightness and resolution is key to clear viewing. Too much or too little of either could hamper image quality. Different specimens require different settings – there isn’t one-size-fits-all here. Click the following link to learn if microscopes invert images.
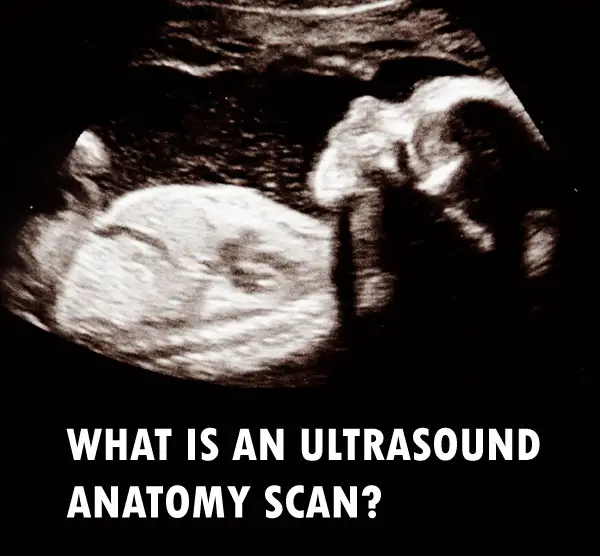
Ultrasound Anatomy Scan: Uses, Timing and Importance
An ultrasound anatomy scan is a vital tool in the field of prenatal healthcare. Noninvasive ultrasound imaging enables medical personnel to examine the development of a fetus’ key organs, amniotic fluid levels, and more.
As we look deeper, you will gain insights into the role of ultrasound technicians and diagnostic medical sonographers. These professionals act as crucial patient-physician liaison provider services, bridging gaps between expectant parents and their doctors by providing essential diagnostic information needed for comprehensive prenatal care.
We’ll also explore the timing and preparation required for a routine fetal anatomic survey. Additionally, key features examined during an ultrasound anatomy scan such as monitoring amniotic fluid levels and assessing baby’s heart rate will be discussed in detail.
Finally, I will cover how early identification of potential anomalies like cleft lip can make significant differences in treatment plans. Furthermore, we’ll touch upon maternal health assessment aspects such as evaluating placenta position and checking umbilical cord structure during an anatomy scan.
What is the Ultrasound Anatomy Scan
Welcome to the fascinating world of ultrasound anatomy scans.
This procedure, also known as a routine fetal anatomy ultrasound, is a must-have for all expecting parents.
What’s the Scoop?
Anatomy scans are like a backstage pass to your baby’s development. They provide detailed images of your little one’s internal organs and structures in the womb.
A Peek Inside the Womb: What Does an Anatomy Scan Show?
- Fetal heart rate
- Major organs like the brain and spine
- Amniotic fluid level
These scans are like detectives, helping to spot any potential anomalies early on, such as congenital heart defects or cleft lip.
Monitoring amniotic fluid levels during these scans is also crucial for ensuring your baby’s healthy development.
Now that you know what an anatomy scan entails, let’s dive into the preparations and the professionals who conduct these procedures.
Role of Ultrasound Technicians and Diagnostic Medical Sonographers
Let’s first talk about the professionals involved- ultrasound technicians and diagnostic medical sonographers.
The Patient-Physician Liaison Provider Services
An important part of their job? Being the middlemen (or middlewomen) between patients and physicians.
They provide all the diagnostic info needed, from baby’s internal organs to amniotic fluid levels, keeping everyone in the loop.
This info is crucial for getting the right medical care and keeping both mom and baby healthy.
Making Patients Comfortable on The Exam Table
Not only do they measure like pros during a routine fetal anatomic survey, but they also make sure patients are comfy on the exam table.
Liaising with Other Healthcare Providers
In this role, they work closely with insurance medical records visitors maps teams too.
Sonographer’s Responsibility: Providing Essential Info:
Last but not least – Their main gig? Providing all the essential info.
Timing and Preparation for a Routine Fetal Anatomic Survey
The best time for a routine fetal anatomic survey, also known as a level 2 ultrasound, is between 18 to 22 weeks of pregnancy. It’s like a sneak peek into your baby’s world.
This noninvasive prenatal testing gives the medical team all the juicy diagnostic information they need about your little one’s health. No secrets here.
Tips on Preparing For Your Anatomy Scan
To make sure those ultrasound images are crystal clear, here are some things you can do to get ready:
- Hydrate: Guzzle that H2O. Drinking plenty of water before your appointment helps get better baby pics by filling up your bladder and pushing the uterus into a better position. Say cheese.
- Dress Comfortably: Get your comfy clothes on. You’ll be lying down on an exam table with some gel on your belly, so loose-fitting attire is the way to go. Fashion meets function.
- Maintain Regular Check-ups: Keep those appointments coming. Stay on top of your regular check-ups to make sure that any needed interventions or changes can be done quickly. Stay in the loop.
You might be wondering what happens next after all this prep work. Well, get ready for the grand reveal.
In our upcoming section, we’ll dive deep into the fascinating world within the womb and explore the key features examined during an Ultrasound Anatomy Scan.
Key Anatomy Features Examined During an Ultrasound Scan
During an ultrasound scan, the technician closely examines key anatomy features such as the baby’s brain, heart and spine. Talk about an inside job.
Monitoring Amniotic Fluid Levels
Amniotic fluid level plays a crucial role in your little one’s development. It’s like the perfect amount of water in a swimming pool – not too much, not too little. Gotta make sure there’s enough room for those tiny muscles and bones to grow.
Assessing Baby’s Heart Rate
Fetal heart rate monitoring is a big deal during an anatomy scan. We’re talking about the baby’s ticker here. A normal range is usually between 120-180 beats per minute. Anything outside that range might need some extra attention from the medical team.
Identifying Potential Anomalies Early On
The majority of fetal cysts disappear by the 28th week of pregnancy with no effect on the baby.
However, certain anomalies like congenital heart defects need immediate attention because they’re a leading cause of birth defects and infant death.
Recognizing Cleft Lip Early
Cleft lip affects about one in every 600 newborns in the US, making it the fourth most common birth defect.
Now let’s talk about how an anatomy scan can also be crucial for assessing maternal health.
Maternal Health Assessment During Anatomy Scan
An anatomy scan isn’t just about the baby. It’s also a critical tool for assessing maternal health, because let’s face it, moms matter too.
Evaluating Placenta Position
The placenta is your baby’s lifeline during pregnancy, supplying essential nutrients and oxygen. According to Mayo Clinic, its position can influence delivery plans – it should ideally be away from the cervix to allow safe passage for the baby at birth time. So let’s keep that placenta in the right place.
Checking Umbilical Cord Structure
A well-functioning umbilical cord ensures efficient exchange of vital substances between mother and fetus. Ultrasound technicians closely examine potential issues like single artery or knots, because we don’t want any cord complications later on. Safety first.
Remember: an anatomy scan serves dual purposes. Besides giving you glimpses of your little one kicking around inside there (the best part), it provides invaluable diagnostic information needed by the medical team to ensure both mom-to-be’s wellbeing along with her growing bundle of joy.
Records: Navigating the Maze
Medical records can be as confusing as a corn maze.
But fear not, they’re essential for getting top-notch care during your pregnancy.
The Power of Accurate Record Keeping
Keeping your insurance medical records in order is key to getting the best healthcare.
Research shows that clear documentation helps doctors communicate effectively.
Cracking the Code: Understanding Diagnostic Info for Prenatal Care
- Keep track of your routine fetal anatomy ultrasound reports – they’re packed with important diagnostic info for your doctor.
- Well-documented history helps doctors make informed diagnoses, leading to better prenatal care quality.
Unraveling the Importance of Key Statistics and Facts
In the world of ultrasound anatomy scans, numbers speak volumes.
The CDC says cleft lip affects 1 in 600 newborns.
The Significance of Fetal Heart Rate
Fetal heart rate can range from 120-180 beats per minute during an anatomy scan. It’s like a tiny DJ spinning some sick beats.
This helps ultrasound technicians keep tabs on baby’s health. They’re like the medical DJs of the womb.
Anomalies Detected Early On: Congenital Heart Defects
Congenital heart defects are a leading cause of infant death worldwide, according to the World Heart Federation. Let’s give those little hearts some extra love.
FAQs in Relation to Ultrasound Anatomy Scan
What is the importance of an anatomy ultrasound?
An anatomy ultrasound is like a sneak peek into your baby’s world, checking out their major organs and making sure everything is A-OK.
When should you schedule a routine fetal anatomy ultrasound?
For the best view of your little one’s insides, aim for the sweet spot between 18 to 22 weeks of pregnancy.
What’s the deal with an anatomy scan?
An anatomy scan is like a superhero ultrasound, giving you all the diagnostic information your medical team needs to keep your baby healthy.
Is an anatomy scan the same as a regular ultrasound?
An anatomy scan is like a VIP ultrasound, focusing on your baby’s internal organs and other important stuff.
Conclusion
Performed by ultrasound technicians and diagnostic medical sonographers, this noninvasive prenatal testing is the real MVP when it comes to spotting any potential issues early on. From checking the baby’s amniotic fluid levels to evaluating the position of the placenta and umbilical cord, this ultrasound is like a superhero with x-ray vision. It’s like the baby’s own personal exam table, where we can take a closer look at their little heart, making sure it’s beating strong and steady. And if there are any soft markers or signs of congenital heart defects, this ultrasound will catch them faster than a speeding bullet. So, if you’re expecting, don’t skip the routine fetal anatomy ultrasound – it’s the key to getting the diagnostic information needed for proper medical care. Click the following link to learn why you would need a CT scan and an ultrasound.
Best Free Dicom Viewers: Reviews, Pros and Cons
Picture this scenario: You’re a medical professional or student in need of the best free DICOM viewer to analyze and share complex medical images. Choosing the right free DICOM viewer can be a daunting task – but don’t worry, this post will help you find the perfect fit.
In this article, I will explore some of the top free DICOM viewers for various platforms like Windows and Mac. I’ll dive into their features, ease of use, and what sets them apart from others. By the conclusion of this article, you should have a good grasp on which free DICOM viewer will suit your requirements best.
Let’s get started….
List of DICOM Viewers
3DimViewer
Looking for a free and versatile DICOM viewer? 3DimViewer is an excellent choice for students and professionals. 3DimViewer is a software application primarily used for medical imaging visualization and analysis.
With the ability to display multiple slices simultaneously, 3DimViewer allows for more effective visualization of complex structures, and provides tools for measuring distances, angles, and areas within the images.
Features of 3DimViewer
-
Cross-platform compatibility: Accessible on Windows, Linux, and macOS systems.
-
User-friendly interface: Intuitive and easy to navigate.
-
Multimodality support: View CT, MRI, PET scans, and other image formats like TIFF or JPEG.
-
Fusion functionality: Combine different imaging modalities into one comprehensive view.
-
Volumetric rendering: Visualize data in three dimensions with volume rendering capabilities.
Pros:
- Advanced Visualization: 3DimViewer offers advanced 3D visualization capabilities, allowing users to view and manipulate medical images in a three-dimensional space. This can provide a better understanding of complex anatomical structures or abnormalities.
- Multi-Modality Support: The software supports various medical imaging modalities, including CT scans, MRI, ultrasound, and more. This versatility enables users to work with different types of medical image data within a single application.
- Measurement and Analysis Tools: 3DimViewer provides tools for measuring distances, angles, and volumes within the rendered 3D models. These features can be beneficial for quantitative analysis and surgical planning.
- Intuitive User Interface: The software offers a user-friendly interface, making it relatively easy for users to navigate and interact with the 3D models. This can enhance the overall user experience and shorten the learning curve.
- Cross-Platform Compatibility: 3DimViewer is available for Windows, macOS, and Linux operating systems, allowing users to access the software on their preferred platform.
Cons:
- Limited Editing Capabilities: While 3DimViewer excels at visualization and analysis, it may have limitations when it comes to editing or modifying the 3D models. Users looking for more extensive editing capabilities may need to rely on additional software.
- Resource Intensive: Working with large medical image datasets or complex 3D models can require significant computational resources. Users with lower-end hardware or limited system specifications may experience performance issues or slow rendering times.
- Lack of Advanced Segmentation Features: While 3DimViewer offers basic segmentation tools, it may not have the full suite of advanced segmentation features found in dedicated medical image processing software. This could limit the precision and efficiency of segmenting specific regions of interest.
- Cost: While 3DimViewer provides a free version with basic functionality, certain advanced features or additional modules may require a paid license. This cost consideration may be a disadvantage for users with limited budgets.
- Limited File Format Support: While 3DimViewer supports common medical image file formats like DICOM, it may not support some proprietary or less common formats. This could pose a challenge if working with specialized image data or incompatible file formats.
Tips for Using 3DimViewer Effectively
To make the most out of this powerful tool, learn essential keyboard shortcuts and check out their documentation page for a list of available commands.
AlgoM DICOM Viewer
The AlgoM DICOM Viewer is a comprehensive and user-friendly software solution designed to enable 3D imaging professionals and students to explore, analyze, and modify medical images stored in the DICOM format.
Key Features:
-
Intuitive Interface: The AlgoM DICOM Viewer boasts an easy-to-use interface that simplifies navigation through complex medical data sets.
- Pseudocoloring Functionality: Users can apply pseudocolors to their images to enhance visualization and interpretation of anatomical structures within the image data set.
-
Cross-platform compatibility for seamless access across devices.
-
Advanced visualization tools for image manipulation and 3D reconstructions.
-
Anonymization support for privacy purposes.
Pros:
- DICOM Compatibility: AlgoM DICOM Viewer is specifically built for handling DICOM files, which are the standard format for medical images. It ensures seamless compatibility with various medical imaging devices and systems, allowing users to view and interpret DICOM images accurately.
- User-Friendly Interface: The software offers a user-friendly and intuitive interface, making it easy for users to navigate, manipulate, and analyze medical images. This can enhance productivity and shorten the learning curve for new users.
- Advanced Visualization Tools: AlgoM DICOM Viewer provides advanced visualization tools, such as multi-planar reconstruction (MPR), 3D rendering, and image fusion capabilities. These features enable users to visualize anatomical structures from different perspectives and enhance their understanding of complex medical data.
- Measurement and Annotation Features: The software offers measurement and annotation tools that allow users to perform quantitative analysis on medical images. Users can make measurements, add annotations, and generate reports, which can be valuable for diagnostic purposes and documentation.
- Customization and Integration: AlgoM DICOM Viewer offers customization options, allowing users to tailor the software to their specific needs. It also supports integration with other medical imaging systems and software, facilitating seamless workflow integration and data exchange.
Cons:
- Limited Advanced Analysis Features: While AlgoM DICOM Viewer provides basic measurement and annotation tools, it may not offer advanced analysis features found in more specialized software. Users with advanced analysis requirements may need to utilize additional software or modules.
- Resource Intensive: Processing large DICOM datasets or complex 3D reconstructions can be resource-intensive, requiring significant computational power. Users with lower-end hardware or limited system specifications may experience performance issues or slower processing times.
- Limited File Format Support: While AlgoM DICOM Viewer excels at handling DICOM files, it may not support other image file formats commonly used in medical imaging. Users working with non-DICOM image data may need to convert or rely on alternative software.
- Cost: AlgoM DICOM Viewer may require a paid license for certain advanced features or modules. The cost consideration could be a disadvantage for users with limited budgets or those looking for free alternatives.
- Lack of Collaboration Features: The software may have limited collaboration features, such as real-time sharing or remote access capabilities. This could hinder collaborative work among healthcare professionals or remote consultations.
Educational Applications:
AlgoM’s DICOM viewer is an excellent educational resource for students studying radiology or other imaging-related fields, providing hands-on experience with real-life cases and high-quality images for enhanced learning experiences.
Aliza MS DICOM Viewer
The Aliza MS DICOM Viewer is a versatile and user-friendly software solution designed for students and professionals. This free viewer allows users to easily view, analyze, and manipulate medical images stored in the Digital Imaging and Communications in Medicine (DICOM) format.
Main Features of Aliza MS DICOM Viewer
-
Cross-platform compatibility: Install on Windows, macOS, or Linux.
-
User-friendly interface: Intuitive design for easy navigation.
-
Multimodality support: Supports various imaging modalities such as CT, MRI, PET/CT fusion imaging, ultrasound scans, and more.
-
Anonymization tools: Remove sensitive patient information from image files before sharing or using for research.
Add-on Modules for Enhanced Functionality
Aliza offers several optional add-on modules that cater to specific needs within the scientific community.
-
Advanced visualization tools: Volume rendering techniques (VRT), maximum intensity projection (MIP), multiplanar reconstruction (MPR), surface rendering algorithms.
-
Segmentation capabilities: Segment images for further analysis.
-
Registration methods: Align images for comparison.
-
Quantitative analysis options: Time-intensity curve analysis or SUV measurements.
Aliza MS DICOM Viewer is an excellent choice for viewing and analyzing medical images. Its comprehensive features and compatibility with various imaging modalities make it a valuable tool for your work.
Pros:
- Multiplanar reconstruction (MPR), fusion of multiple series or modalities, and volumetric rendering with adjustable opacity settings.
- Region-of-interest (ROI) analysis tools for quantification purposes.
- Built-in support for sharing DICOM images via email or other communication systems.
- Seamless integration with other software platforms like MATLAB® and Python through its scripting interface.
- Upgrade to the paid version for additional features like automatic registration between different imaging modalities or exporting data into popular formats like NIfTI-1 or Analyze7.5.
- Compatible with a variety of operating systems, Aliza MS DICOM Viewer is an ideal solution for your medical imaging needs.
Cons:
- Paid version allows editing of metadata
AMIDE
If you’re looking for specialized open source options in the world of free DICOM viewers, then AMIDE might just be your perfect match.
But what exactly sets AMIDE apart from other DICOM viewers?
-
User-friendly interface: Navigating through complex nuclear medicine images has never been easier thanks to AMIDE’s intuitive and straightforward design.
-
Fusion capabilities: Merge different modalities such as PET/CT or SPECT/CT with ease using this powerful feature within the software.
-
Data analysis tools: Analyze and quantify data directly within the viewer by creating regions of interest (ROIs) and generating time-activity curves (TACs).
-
Cross-platform compatibility: Whether you’re on Windows, macOS, or Linux – rest assured that AMIDE has got you covered.
Pros:
-
The ability to handle large datasets without compromising performance – crucial when dealing with high-resolution medical images.
-
A wide range of supported file formats including but not limited to DICOM files; ensuring maximum compatibility with various imaging modalities.
-
Open-source developers continually refine and enhance the program, keeping it in line with industry standards and tech advancements.
- Offers several essential features for working with DICOM images, including multidimensional image display, slice-based viewing, fusion support, and volumetric rendering capabilities.
- Provides tools for measuring distances within images accurately and creating custom color maps tailored specifically to your needs.
Cons:
-
Limited support: As an open-source project, there might be limited technical support available compared to paid versions or commercial DICOM viewers. However, you can always rely on the active user community for help.
-
No mobile version: Unfortunately, AMIDE does not have a mobile app counterpart – but don’t worry. There are plenty of other free DICOM viewer options out there if you need to access your images on-the-go.
If you’re seeking a specialized open source option tailored specifically for nuclear medicine imaging studies – look no further than AMIDE as your go-to free DICOM viewer. The combination of powerful features like fusion capabilities and data analysis tools paired with cross-platform compatibility makes it an excellent choice for professionals working within this field.
ClearCanvas DICOM Server
The ClearCanvas DICOM server is a free, open-source software solution designed to facilitate the management and distribution of medical imaging data in the DICOM format.
Pros:
-
Cross-Platform Compatibility: Access files from any device with Windows, macOS, and Linux operating systems.
-
PACS Integration: Store, retrieve, manage, distribute or display digital medical imaging data efficiently. Seamlessly integrates into existing hospital networks as a fully functional PACS solution, allowing efficient storage retrieval methods across multiple sites/devices – including smart televisions and mobile apps.
-
Data Security: Secure storage options for sensitive information ensure patient confidentiality. ClearCanvas DICOM Server provides mechanisms for secure data transfer, including encryption and authentication protocols. This ensures the confidentiality and integrity of sensitive patient information during transmission, contributing to HIPAA compliance and data security.
-
Efficient Data Management: The server offers robust data management capabilities, allowing for the storage, retrieval, and organization of medical imaging data. It supports features like patient and study management, metadata indexing, and study routing, which can enhance workflow efficiency and data accessibility.
- Scalability and Performance: The server is designed to handle large volumes of DICOM data efficiently. It can scale to accommodate growing data storage requirements and multiple concurrent connections, enabling reliable performance in high-demand environments.
- Customization and Integration: ClearCanvas DICOM Server offers customization options, allowing users to tailor the system to their specific needs. It supports integration with existing healthcare IT infrastructure, such as EMR (Electronic Medical Record) systems or third-party software, facilitating seamless data exchange and interoperability.
- Provides tools for viewing multi-frame series like CT scans or MRIs with brightness/contrast adjustments and zooming capabilities.
Cons:
- Complexity for Non-Technical Users: Setting up and configuring ClearCanvas DICOM Server may require technical expertise, particularly for users who are not familiar with server administration or DICOM protocols. Some level of technical knowledge or IT support may be necessary to ensure proper installation and maintenance.
- Learning Curve: As with any server software, there may be a learning curve for users who are new to ClearCanvas DICOM Server. Becoming proficient in managing and operating the server may require time and training.
- Cost: ClearCanvas DICOM Server may require a paid license or subscription, depending on the specific edition or features needed. The cost consideration could be a disadvantage for users with limited budgets.
ClearCanvas also offers various tools to enhance image viewing capabilities, including brightness/contrast adjustments, zooming, and measurement tools for calculating distances and angles within the image plane.
Dicompyler
Dicompyler is a free DICOM viewer with a user-friendly interface for viewing medical images. Dicompyler integrates well with existing workflows thanks to its support for communication system standards like DICOM networking protocols, allowing seamless sharing of DICOM images between workstations or even smart televisions within your organization’s network infrastructure.
Pros
-
Cross-platform compatibility: Works on Windows, Mac OS X, and Linux systems.
-
Extensibility: Can be extended with plugins written in Python programming language.
-
Multimodality support: Supports various imaging modalities such as CT, MRI, PET, and others.
- DICOM Compatibility: It supports various DICOM modalities and can handle multiple DICOM objects.
- Image Visualization: Dicompyler offers a user-friendly interface for viewing and exploring medical images. It provides tools for windowing, zooming, panning, and scrolling through image slices, allowing users to examine and analyze the data in detail.
- DICOM Header Inspection: The software allows users to inspect the DICOM header information, providing access to various metadata associated with the medical images. This can be useful for studying image acquisition parameters, patient demographics, and other relevant information.
- DICOM RT Analysis: Dicompyler includes features for analyzing DICOM Radiotherapy (RT) data. It supports the visualization of RT structure sets, dose distributions, and treatment plans, enabling users to evaluate radiation therapy-related information.
- Open-Source and Customization: Dicompyler is an open-source tool, which means that the source code is freely available, allowing users to customize and extend its functionality as needed. This makes it suitable for developers or users with specific requirements who want to modify or enhance the software.
Cons
- Limited Advanced Analysis: While Dicompyler provides basic image visualization and analysis capabilities, it may have limitations in performing advanced quantitative analysis or specialized image processing. Users with complex analysis needs may require additional software or modules.
- User Interface and Usability: The user interface of Dicompyler may not be as polished or intuitive compared to some commercial DICOM viewers. Users might experience a learning curve or find it less user-friendly, especially if they are accustomed to more modern and feature-rich interfaces.
- Software Updates and Support: As an open-source project, the availability of regular updates, bug fixes, and technical support for Dicompyler may vary. Users may rely on community forums or resources for assistance, which might not always provide immediate or comprehensive support.
- Dependency on External Software: Dicompyler relies on external libraries and tools for certain functionalities, such as image processing or rendering. Managing these dependencies and ensuring compatibility with the required software versions can sometimes be challenging.
Tutorials & Community Support
There are numerous tutorials available online covering basic usage scenarios as well as more advanced topics like creating custom plugins, and the active community surrounding Dicompyler offers assistance through forums where questions can be answered by fellow users and developers.
DICOM Web Viewer (DWV)
DWV is an open-source, free software that enables you to view and manipulate DICOM images directly from your web browser without the need for additional plugins or downloads.
Pros
-
Cross-platform compatibility: DWV works on all major browsers and platforms on any devices with an internet connection and modern browser.
-
Easy navigation: The intuitive interface enables users to easily navigate through images using touch gestures or mouse controls.
-
Multiformat support: DWV supports DICOM files, JPEG, PNG, TIFF, and other common image formats.
-
Anonymization tools: Protect patient privacy by removing sensitive information from the metadata before sharing or storing images.
Cons
The basic version is free and offers many useful features, but those looking for advanced functionality can opt for a paid version which includes additional tools like image annotation capabilities or integration into existing communication systems such as PACS servers.
Add-Ons & Extensions
DWV offers various add-ons and extensions that enhance its functionality, such as:
Orthanc Plugin: Integrates DWV into Orthanc’s web interface for seamless image viewing within your PACS system.
With its extensive features, cross-platform compatibility, and support for various image formats, DWV is an excellent choice for students and professionals in need of a reliable free DICOM viewer.
DICOMscope
If you’re searching for a simple yet effective solution that won’t weigh down your computer system with unnecessary features or bloatware, DICOMScope is the answer. Be advised though that it is not meant to be used for medical diagnosis.
Pros:
- Image Visualization: DICOMscope provides a comprehensive set of tools for viewing and analyzing medical images. It offers features such as zooming, panning, windowing, and scrolling through image slices, allowing users to explore and examine the data in detail.
- DICOM Header Inspection: The software allows users to inspect the DICOM header information, providing access to metadata associated with the medical images. This can be useful for studying image acquisition parameters, patient demographics, and other relevant information.
- Image Analysis and Measurement: DICOMscope offers measurement tools for performing basic quantitative analysis on medical images. Users can make measurements, calculate distances, areas, and angles, aiding in diagnostic assessment or research purposes.
- Export and Conversion: DICOMscope provides options to export or convert DICOM files to other formats, such as JPEG, PNG, or TIFF. This can be beneficial for generating image reports, sharing data with non-DICOM systems, or archiving images in different file formats.
Cons:
- User Interface and Usability: The user interface of DICOMscope may not be as modern or intuitive compared to some commercial DICOM viewers. Users might experience a learning curve or find it less user-friendly, especially if they are accustomed to more polished interfaces.
- Limited Advanced Analysis: While DICOMscope offers basic image analysis capabilities, it may have limitations in performing advanced quantitative analysis or specialized image processing. Users with complex analysis needs may require additional software or modules.
- Updates and Support: DICOMscope is a free and open-source project, which means that the availability of regular updates, bug fixes, and technical support may vary. Users may rely on community forums or resources for assistance, which might not always provide immediate or comprehensive support.
- Limited Cross-Platform Support: DICOMscope is primarily developed for the Windows operating system, which may limit its usability for users on other platforms such as macOS or Linux. However, alternative installation methods or community-driven initiatives may provide compatibility with other platforms.
- Dependency on External Tools: DICOMscope relies on external libraries or tools for certain functionalities, such as image processing or rendering. Managing these dependencies and ensuring compatibility with the required software versions can sometimes be challenging.
ezDICOM
If you’re after a simple and user-friendly free DICOM viewer, ezDICOM is the perfect choice for you.
This lightweight software is designed to display various types of medical images, including DICOM files, and supports several image formats such as JPEG, BMP, TIFF, PNG, and GIF.
For a hassle-free experience, ezDICOM can be downloaded as an executable file and used on Windows, Mac OS X, or Linux.
Pros
-
User-friendly interface: Navigate through your image files with ease using the intuitive design.
-
Cross-platform compatibility: Access ezDICOM on any major operating system without any additional software downloads.
-
Support for multiple file formats: ezDICOM supports DICOM files (.dcm), JPEG2000 (.jp2), TIFF (.tif), PNG (.png), BMP (.bmp) and more.
-
Data security: Your sensitive information is encrypted during transmission using SSL/TLS protocols, and data is not stored on their servers after you close your session.
Cons
Doesnt offer more advanced features
Ginkgo CADx
Ginkgo CADx is an open-source software that supports various DICOM file types and formats.
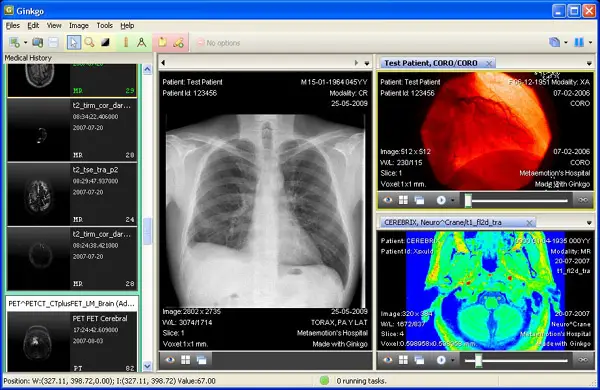
Features:
-
Cross-platform compatibility: Ginkgo CADx works on Windows, Linux, and macOS.
-
Multimodality support: Ginkgo CADx can handle DICOM files, as well as other image formats like JPEG or PNG.
-
PACS integration: Connect to your Picture Archiving and Communication System (PACS) servers for efficient management of large volumes of medical images.
- Anonymization tool: Users can anonymize patient data before sharing files to maintain privacy standards within their organization or research group.
Pros:
- Image Visualization and Manipulation: The software provides a range of visualization tools, including windowing, zooming, panning, and scrolling through image slices. It allows users to manipulate and analyze medical images in detail, enhancing diagnostic capabilities.
- Multi-Platform Support: Ginkgo CADx is available for multiple platforms, including Windows, Linux, and macOS. This allows users to access and utilize the software on their preferred operating system.
- Plugin Architecture: Ginkgo CADx offers a plugin architecture that allows users to extend the software’s functionality and integrate additional features or tools. This enables customization and adaptation to specific user needs or workflows.
- Integrated Workstation Features: Ginkgo CADx integrates various features typically found in radiology workstations, including advanced image processing, measurements, annotations, and reporting tools. This facilitates comprehensive image analysis and reporting within a single application.
Cons:
- User Interface and Learning Curve: Some users may find the user interface of Ginkgo CADx less intuitive or dated compared to other commercial DICOM viewers. The learning curve to become proficient in using the software may be steeper, especially for those accustomed to more modern interfaces.
- Limited Advanced Analysis: While Ginkgo CADx provides essential image analysis tools, it may have limitations in performing advanced quantitative analysis or specialized image processing. Users with complex analysis needs may require additional software or modules.
- Updates and Support: Ginkgo CADx is an open-source project, and the availability of regular updates, bug fixes, and technical support may vary. Users may rely on community forums or resources for assistance, which might not always provide immediate or comprehensive support.
- Integration with External Systems: Integrating Ginkgo CADx with other healthcare IT systems or workflow tools may require additional customization or development efforts. The ease of integration can depend on the specific requirements and existing infrastructure.
- Dependency on External Tools: Ginkgo CADx may rely on external libraries or tools for certain functionalities, such as image processing or rendering. Managing these dependencies and ensuring compatibility with the required software versions can sometimes be challenging.
Ginkgo CADx is perfect for educational purposes and professional use, thanks to its advanced visualization tools. It can display multiple image slices simultaneously in different orientations (axial, sagittal, coronal), enabling detailed analysis and comparison between different scans. Plus, it includes measurement tools for accurate quantification and annotation capabilities for easy sharing with colleagues or classmates. Overall, Ginkgo CADx is a comprehensive and user-friendly DICOM viewer that’s perfect for anyone working with medical imaging data.
Horos
Horos, a free open-source DICOM viewer, is tailored exclusively for macOS users who demand high-quality performance and functionality.
This versatile software offers 2D/3D image rendering, multi-planar reconstruction (MPR), volume rendering capabilities, and much more.
You can even share DICOM images with other professionals or patients through Horos Cloud Reporting platform – talk about convenience.
Pros
- Image Visualization and Manipulation: Horos provides a range of visualization tools, including windowing, zooming, panning, and scrolling through image slices. It allows users to manipulate and analyze medical images in detail, enhancing diagnostic capabilities.
- Open-Source and Customization: Horos is an open-source project, providing access to the source code and allowing users to customize and extend its functionality as needed. This makes it suitable for developers or users with specific requirements who want to modify or enhance the software.
- Integrated Workstation Features: Horos integrates various features typically found in radiology workstations, including advanced image processing, measurements, annotations, and reporting tools. This facilitates comprehensive image analysis and reporting within a single application.
Cons:
- User Interface and Learning Curve: Some users may find the user interface of Horos DICOM Viewer less intuitive or less polished compared to some commercial DICOM viewers. The learning curve to become proficient in using the software may be steeper, especially for those accustomed to more modern interfaces.
- Limited Advanced Analysis: While Horos provides essential image analysis tools, it may have limitations in performing advanced quantitative analysis or specialized image processing. Users with complex analysis needs may require additional software or modules.
- Updates and Support: As an open-source project, the availability of regular updates, bug fixes, and technical support for Horos DICOM Viewer may vary. Users may rely on community forums or resources for assistance, which might not always provide immediate or comprehensive support.
- Integration with External Systems: Integrating Horos DICOM Viewer with other healthcare IT systems or workflow tools may require additional customization or development efforts. The ease of integration can depend on the specific requirements and existing infrastructure.
- Dependency on External Tools: Horos DICOM Viewer may rely on external libraries or tools for certain functionalities, such as image processing or rendering. Managing these dependencies and ensuring compatibility with the required software versions can sometimes be challenging.
IrfanView
Another great option for those seeking simplicity is IrfanView. This popular image viewer has added support for opening and viewing DICOM files along with its already extensive list of supported formats. It’s not specifically designed for medical imaging, but it does a great job of displaying DICOM images.
In addition to being an efficient tool for handling DICOM files, IrfanView also serves as a comprehensive multimedia player supporting audio and video playback.
Its compatibility with smart televisions makes it even more appealing for users who wish to share their work on larger screens easily.
With constant updates since its inception in 1996, this open-source software continues evolving while maintaining its reputation as a reliable and efficient DICOM viewer.
Pros:
-
Easy to use and navigate
-
Supports various image formats, including DICOM
-
Offers basic image manipulation tools like cropping and resizing
Cons:
-
Lacks some advanced features found in dedicated DICOM viewers
- Windows version only
IrfanView provides a straightforward approach for those who want something simple yet effective in opening and viewing different types of image formats including DICOM.
OsiriX Lite
OsiriX Lite, another fantastic option for Mac users, serves as the free version of the renowned OsiriX MD imaging software.
This lightweight DICOM viewer provides essential features such as 2D/3D visualization tools and support for various medical imaging formats like NIfTI or Analyze files.
Pros:
- Image Visualization and Manipulation: OsiriX Lite provides a wide range of tools for visualizing and manipulating medical images. It offers features such as windowing, zooming, panning, scrolling through image slices, and 3D rendering, allowing users to analyze and explore the data in detail.
- Cross-Platform Support: OsiriX Lite is available for macOS and Windows, providing users with flexibility in choosing their preferred operating system.
- 3D Visualization and Analysis: OsiriX Lite offers advanced 3D visualization capabilities, enabling users to reconstruct and visualize medical images in three dimensions. This can be particularly useful for surgical planning, anatomical studies, and educational purposes.
- Plugin and Extension Support: OsiriX Lite allows users to extend its functionality through plugins and extensions. This enables customization and adaptation to specific user needs or workflows, providing additional tools and features.
Cons:
- Learning Curve: OsiriX Lite has a rich set of features, but mastering the software may require some time and effort. The user interface and workflows may be initially overwhelming for new users, especially those without prior experience in using advanced imaging software.
- Limited Advanced Analysis: While OsiriX Lite offers powerful image visualization and basic analysis tools, it may have limitations in performing advanced quantitative analysis or specialized image processing. Users with complex analysis needs may require additional software or modules.
- Updates and Support: As an open-source project, the availability of regular updates, bug fixes, and technical support for OsiriX Lite may vary. Users may rely on community forums or resources for assistance, which might not always provide immediate or comprehensive support.
- Integration with External Systems: Integrating OsiriX Lite with other healthcare IT systems or workflow tools may require additional customization or development efforts. The ease of integration can depend on the specific requirements and existing infrastructure.
- Dependency on External Tools: OsiriX Lite may rely on external libraries or tools for certain functionalities, such as image processing or rendering. Managing these dependencies and ensuring compatibility with the required software versions can sometimes be challenging.
RadiAnt DICOM Viewer
RadiAnt DICOM Viewer is an excellent choice if you want a lightweight and user-friendly solution. This viewer offers features such as full-screen mode, standard manipulation tools, measurement capabilities, multiple windows support, and reconstruction functionality. The software also provides multi-planar (MPR) and maximum intensity projection (MIP) rendering to help visualize complex structures within the images better.
Pros:
-
User-friendly interface
-
Powerful visualization tools like MPR/MIP rendering
- PET-CT image fusion
- Digital subtraction angiography
-
No need for installation – just download and run.
Cons:
-
Limited advanced features compared to some other viewers on this list
- Windows only
Weasis DICOM Viewer
Weasis is an exceptional choice if you’re looking for a lightweight DICOM viewer that doesn’t skimp on features.
Besides its impressive platform versatility, Weasis also boasts multi-touch feature integration which makes navigating through your dicom images smoother than ever before.
The software even allows users to share dicom images with ease using its integrated communication system – perfect for collaborating with colleagues or classmates.
Pros
- Image Visualization and Manipulation: Weasis provides a range of tools for visualizing and manipulating medical images. It offers features such as windowing, zooming, panning, scrolling through image slices, and image fusion, enabling users to analyze and explore the data in detail.
- Multi-Platform Support: Weasis is built on Java, making it platform-independent. It can be used on various operating systems, including Windows, macOS, and Linux, providing users with flexibility in choosing their preferred platform.
- Plugin Architecture: Weasis offers a plugin architecture that allows users to extend its functionality. Additional plugins can be developed to integrate new features, tools, or specialized analysis algorithms into the viewer, enhancing its capabilities.
- Open-Source and Customization: Weasis is an open-source project, providing access to the source code and allowing users to customize and modify the software to suit their specific requirements. This makes it suitable for developers or users with specific needs who want to adapt the software.
Cons:
- Learning Curve: Weasis has a rich set of features and a complex user interface, which may require some time and effort to learn and become proficient in using the software effectively. New users, especially those without prior experience in advanced imaging software, may find the learning curve steep.
- Limited Advanced Analysis: While Weasis offers basic image visualization and analysis tools, it may have limitations in performing advanced quantitative analysis or specialized image processing. Users with complex analysis needs may require additional software or modules.
- Updates and Support: As an open-source project, the availability of regular updates, bug fixes, and technical support for Weasis may vary. Users may rely on community forums or resources for assistance, which might not always provide immediate or comprehensive support.
- Integration with External Systems: Integrating Weasis with other healthcare IT systems or workflow tools may require additional customization or development efforts. The ease of integration can depend on the specific requirements and existing infrastructure.
- Dependency on Java: Weasis is built on Java, which means it requires a Java Runtime Environment (JRE) to run. Managing JRE versions and ensuring compatibility can be a consideration, especially when working with other software or systems.
FAQs in Relation to Best Free Dicom Viewers
What is the best way to share DICOM files?
The best way to share DICOM files securely is by using cloud-based services like Ambra Health, DICOM Library, or creating anonymized CDs/DVDs/USB drives containing patient data in compliance with privacy regulations such as HIPAA or GDPR.
Do you need to use a paid DICOM Viewer?
You do not, especially if you are not using it for medical diagnosis or you dont have special needs. Many free or open source DICOM viewers have plenty of features as seen above, including the ability to read headers and codes and manipulate the image.
Conclusion
Choosing the best free DICOM viewer depends on your specific needs. No matter the user, be it an academic or a professional in 3D science, there are plenty of choices for those on Windows, Mac and Linux. From simple interfaces to advanced image manipulation capabilities, open-source solutions like Horos and Weasis offer powerful tools that can be adapted to meet specific requirements.
If you require enhanced performance and an extended toolset, paid versions of free DICOM viewers may be worth considering. Regardless of which option you choose, it’s essential to compare features based on ease of use and navigation, MPR/MIP rendering capabilities, and editing tools before making a final decision. Click the following link to learn the differences between DICOM and PACS.
Radiology vs Radiography: Exploring Differences and Careers
In the realm of medical imaging, it’s not uncommon for people to debate ‘Radiology versus radiography’. Both fields play crucial roles in diagnosing and treating patients, but they have distinct differences that are essential to understand.
In this blog post, we will explore various aspects of these two professions including education requirements, salary comparisons, and job responsibilities. Additionally, we will delve into related topics such as sonographers versus radiographers and the difference between radiology and radiotherapy.
Whether you’re considering a career in either field or simply want to expand your knowledge on Radiology vs radiography, this comprehensive guide will provide valuable insights for both aspiring professionals and those already working within these industries.
Radiography vs Radiology: Overview
Radiography and radiology are both essential components of the medical imaging field, but they serve distinct roles and require different levels of education and training. In this section, we will provide an overview of these two professions to help you better understand their differences.
Radiographers
Radiographers, also known as radiologic technologists or X-ray technicians, are responsible for operating advanced imaging equipment such as X-rays, computed tomography (CT) scans, and magnetic resonance imaging (MRI) machines. They work closely with patients to ensure proper positioning for accurate images while maintaining patient safety by adhering to radiation protection guidelines.
Radiologists
Radiologists are specialized physicians who interpret diagnostic images produced by various radiographic imaging techniques. Their expertise allows them to diagnose a wide range of conditions based on the findings in these images. Radiologists often collaborate with other healthcare professionals like surgeons or oncologists when developing treatment plans for patients.
Differences in Scope of Practice
-
Radiographer: Focuses on acquiring high-quality diagnostic images using appropriate equipment settings and patient positioning techniques.
-
Radiologist: Analyzes acquired images to identify abnormalities or diseases that may be present within a patient’s body; provides expert interpretation needed for diagnosis and treatment planning purposes.
In summary, while both radiographers and radiologists play crucial roles in the medical imaging process, their responsibilities and required education differ significantly. Radiographers are skilled technicians who operate imaging equipment to capture diagnostic images, while radiologists are specialized physicians who interpret these images to diagnose and treat patients.
Education Requirements for Radiographers and Radiologists
The education requirements for radiographers and radiologists differ significantly due to the nature of their roles in medical imaging. While both professionals work with radiologic imaging techniques, they have distinct responsibilities that require specific training.
Radiographer Education
An associate’s degree in radiography is the typical requirement to become a radiographer, also known as a radiologic technologist or X-ray technician. Some institutions offer certificate programs or bachelor’s degrees in this field as well. The coursework includes anatomy, radiation physics, patient positioning, image evaluation, and radiation protection. Completing the program necessitates passing an ARRT-administered assessment in order to acquire authorization.
Radiologist Education
Becoming a radiologist requires more extensive education since they are specialized physicians who interpret medical images and perform diagnostic procedures. After obtaining their undergraduate degree, aspiring radiologists must complete four years at an accredited medical school. After obtaining their MD or DO, radiologists must then complete a four-year residency program specializing in diagnostic radiology or interventional radiology to gain hands-on experience interpreting medical images.
During their residency training period, future radiologists gain hands-on experience interpreting various types of medical images such as X-rays, magnetic resonance imaging (MRI), computed tomography (CT) scans, and ultrasound. Additionally, they may choose to pursue a fellowship in a specific area of radiology for one or two years.
Gaining familiarity with the requisite training and qualifications for radiographers and radiologists is imperative to thrive in this domain. With that in mind, let us now evaluate the income disparity between radiographers and radiologists.
Salary Comparison
When considering a career in either radiography or radiology, it’s essential to understand the potential salary differences between these two professions. While both fields offer competitive compensation packages, there are some notable disparities that may influence your decision.
Radiographer Salaries
Radiographers, who require less education and training than radiologists, tend to earn lower salaries. According to the U.S. Bureau of Labor Statistics (BLS), the median annual wage for a radiographer was $62,280 in 2023.
Factors Influencing Radiographer Salaries:
-
Level of experience: Entry-level positions tend to pay less than those with several years of experience.
-
Type of employer: Hospitals generally offer higher salaries compared to outpatient care centers or diagnostic laboratories.
-
Geographical location: Wages can vary significantly depending on regional cost-of-living factors and job market conditions.
Radiologist Salaries
Radiologists, who are highly educated medical professionals with specialized expertise in interpreting medical images using X-rays, CT scans, MRIs and ultrasounds, have the potential to earn significantly higher salaries than other professions. The Medscape Physician Compensation Report states that the average annual salary for a US-based diagnostic radiologist was around $427,000 in 2023.
Factors Influencing Radiologist Salaries:
-
Subspecialty: Some radiologists may choose to specialize in a specific area, such as interventional radiology or pediatric radiology, which can impact their earning potential.
-
Type of employer: Private practice and hospital-based positions tend to offer higher salaries than academic or research roles.
-
Geographical location: Similar to radiographers, wages for radiologists can vary based on regional factors and job market conditions.
In summary, while both careers in the field of medical imaging provide competitive compensation packages, it’s important to consider the differences in education requirements and salary potential when choosing between a career as a radiographer or a radiologist.
Becoming a Radiologist
Becoming a radiologist requires extensive education and training, as they are specialized medical doctors who diagnose and treat diseases using radiologic imaging techniques. The path to becoming a radiologist typically involves the following steps:
-
Earn a Bachelor’s Degree: Aspiring radiologists must first complete an undergraduate degree in pre-med or another related field.
-
Attend Medical School: After completing their bachelor’s degree, students need to apply for and attend an accredited medical school. This is usually a four-year program that covers various aspects of medicine, including anatomy, physiology, pathology, pharmacology, and more.
-
Complete Residency Training: Upon graduating from medical school with either an MD (Doctor of Medicine) or DO (Doctor of Osteopathic Medicine) degree, aspiring radiologists enter into residency programs in diagnostic radiology. These programs generally last four years and provide hands-on experience under the supervision of experienced professionals.
-
Fellowship Training (Optional): Some radiologists choose to pursue additional fellowship training after their residency to specialize further within the field. Fellowships can range from one to three years depending on the specialty chosen.
-
Certification & Licensure: Finally, all practicing physicians must obtain licensure in their state by passing licensing exams such as USMLE (United States Medical Licensing Examination). Additionally, The American Board of Radiology (ABR) offers board certification for qualified candidates who pass its examination process.
The process of becoming a radiologist can be challenging, requiring intensive study and practice. Nevertheless, those who successfully traverse this path will be rewarded with a rewarding career in utilizing advanced medical imaging techniques to diagnose and treat patients.
To become a radiologist, one must have extensive knowledge and experience in medical imaging technology as well as a strong understanding of anatomy. With this knowledge and expertise, you can set out on your path to becoming a master in the field of radiology. Now let’s explore what it takes to become a radiographer – the professionals who use radiation for diagnosis or treatment purposes.
Becoming a Radiographer
For those intrigued by medical imaging yet not eager to devote to the intensive schooling needed for becoming a radiologist, radiography is an ideal career path. Radiographers, otherwise known as radiologic technologists, are tasked with executing imaging tests such as X-rays and CT scans on individuals.
Educational Requirements
To become a radiographer, you will need to complete an accredited radiologic technology program. Completing an accredited radiologic technology program typically requires two years of study, although some institutions offer bachelor’s degree programs that last four. Coursework includes anatomy, patient care, radiation physics and protection, image evaluation, and clinical practice.
Certification & Licensing
After completing your education, you must pass the certification exam administered by the American Registry of Radiologic Technologists (ARRT). This certification demonstrates your competency in radiographic procedures and ensures adherence to professional standards. Additionally, most states require licensure for practicing radiographers; requirements vary by state but generally include passing the ARRT exam or another approved examination.
Continuing Education & Advancement Opportunities
-
Specialization: As a certified radiographer with experience under your belt, you can choose to specialize further within medical imaging fields like mammography or magnetic resonance imaging (MRI).
-
Continuing Education: Radiographers are required to complete continuing education every two years to maintain their certification and stay up-to-date with the latest radiologic imaging techniques.
-
Career Advancement: With additional education, such as a bachelor’s or master’s degree in health administration or management, radiographers can advance into supervisory or administrative roles within medical facilities.
In summary, becoming a radiographer involves completing an accredited program in radiologic technology, obtaining certification from ARRT, and acquiring state licensure if necessary. Opportunities for specialization and career advancement make this profession both rewarding and dynamic.
Gaining a qualification as a radiographer necessitates rigorous preparation and commitment, but can be an immensely gratifying profession. Sonographers and radiographers both use imaging technology to diagnose illnesses; however, there are some key differences between the two roles that should be explored in further detail.
Sonographer vs Radiographer
In the field of medical imaging, both sonographers and radiographers play crucial roles in diagnosing and treating patients. However, there are significant differences between these two professions that potential students and professionals should be aware of before choosing a career path.
Roles and Responsibilities
Sonographers, also known as ultrasound technologists or diagnostic medical sonographers, specialize in using ultrasound technology to capture images of internal organs, tissues, blood vessels, and fetuses during pregnancy. They work closely with physicians to analyze the images for any abnormalities or issues that may require further attention.
Radiographers, on the other hand, are responsible for operating various radiologic imaging techniques, such as X-rays, computed tomography (CT) scans, magnetic resonance imaging (MRI), and mammograms. Their primary role is to produce high-quality images that can assist doctors in diagnosing diseases or injuries.
Educational Requirements
To become a sonographer, candidates typically need an associate’s degree or postsecondary certificate from an accredited program in diagnostic medical sonography. Some programs even offer bachelor’s degrees for those seeking advanced education.
In contrast, radiography candidates must complete an accredited associate’s degree program in radiologic technology or radiography. Additionally, some states require licensure through passing a certification exam administered by the American Registry of Radiologic Technologists (ARRT).
Salary Comparison
The average salary for sonographers and radiographers varies depending on factors such as experience, location, and specialization. According to the Bureau of Labor Statistics (BLS), diagnostic medical sonographers earned a median annual wage of $75,920 in 2023. Meanwhile, radiologic technologists had a median annual wage of $62,280 during the same period.
The two professions of sonography and radiography are quite dissimilar, yet both make vital contributions to the medical realm. Having discussed the distinction between sonographers and radiographers, let us now delve into radiology and radiotherapy to gain a deeper understanding of their respective roles in healthcare.
Difference Between Radiology and Radiotherapy
The fields of radiology and radiotherapy are often confused due to their similar names, but they serve different purposes in patient care. While both involve the use of radiation, radiology focuses on diagnostic imaging techniques to identify medical conditions, whereas radiotherapy is a treatment method that uses high-energy radiation to target cancer cells.
Radiologic Imaging Techniques in Radiology
In radiology, various imaging techniques such as X-rays, computed tomography (CT), magnetic resonance imaging (MRI), ultrasound, and nuclear medicine scans are used by radiologists to diagnose diseases or injuries. These professionals interpret the images obtained from these tests and provide valuable information for physicians who determine the appropriate course of action for patients’ treatments. The primary goal of radiologic imaging is to aid in accurate diagnosis so that proper treatment can be administered.
Treating Cancer with Radiotherapy
On the other hand, radiotherapy involves using targeted radiation beams or radioactive substances directly on cancerous tumors or areas where cancer cells may exist after surgery. This form of therapy aims at killing or shrinking tumor cells while minimizing damage to surrounding healthy tissue. There are two main types of radiotherapy: external beam radiation therapy (EBRT) which delivers focused high-energy rays from outside the body onto specific areas; and internal radiation therapy (brachytherapy) which places radioactive materials inside the body near affected regions.
Career Paths in Radiology vs Radiotherapy
-
Radiology: To become a radiologist, one must complete medical school and then pursue specialized training in diagnostic imaging through a residency program. Afterward, they may choose to further specialize in specific areas such as interventional radiology or pediatric radiology.
-
Radiotherapy: Radiotherapists are also known as radiation oncologists who have completed medical school followed by a residency program focused on cancer treatment using radiation therapy techniques. They work closely with other healthcare professionals like medical physicists and dosimetrists to develop individualized treatment plans for patients.
In summary, while both fields involve the use of radiation technology, their roles differ significantly – with radiology focusing on diagnosis and radiotherapy targeting cancer treatments.
Can a Radiographer Become a Radiologist?
Yes, it is achievable for a radiographer to become a radiologist; however, further study and instruction are needed. A radiographer who wishes to advance their career as a radiologist must first complete an undergraduate degree in radiologic imaging techniques, followed by attending medical school.
-
Undergraduate Degree: To begin the transition from being a radiographer to becoming a radiologist, one needs to have completed or pursue an undergraduate degree in either health sciences or any other relevant field. This will provide them with foundational knowledge required for medical school.
-
Medical School: After completing their undergraduate studies, aspiring radiologists must attend and graduate from an accredited medical school program that typically lasts four years. During this time, they will gain comprehensive knowledge of medicine and specialize in diagnostic imaging techniques such as X-rays, CT scans, MRIs, ultrasounds, etc.
-
Radiology Residency: Upon completion of medical school, graduates need to enter into a residency program specializing in radiology. These programs usually last between four and six years depending on the chosen subspecialty within the field of radiology.
-
Certification & Licensing: Finally, after successfully completing their residency program, candidates are required to pass board certification exams administered by organizations like The American Board of Radiology (ABR) before obtaining licensure needed for practicing independently as qualified radiologists.
It is important to note that the transition from a radiographer to a radiologist requires significant time and financial investment. However, those who successfully complete this process will enjoy higher salaries, increased responsibilities, and more diverse career opportunities within the field of radiologic imaging techniques.
Having explored the distinction between a radiographer and a radiologist, it is imperative to understand the difference between X Ray Tech and Radiology Tech in order to make an informed decision. Now that we have established what distinguishes a radiographer from a radiologist, let’s explore the difference between X Ray Tech and Radiology Tech.
Difference between X-Ray Tech and Radiology Tech
In the world of medical imaging, there are various professionals with specific roles and responsibilities. Two such professionals are X-ray technicians (X-ray techs) and Radiologic Technologists (Radiology techs). Although these terms may seem interchangeable, they refer to different positions within the field.
Roles and Responsibilities
An X-ray technician primarily focuses on performing diagnostic imaging examinations using x-rays. Their primary responsibility is to capture images that help physicians diagnose patients’ conditions accurately.
Radiology technologists, on the other hand, have a broader scope of practice as they can work in multiple radiologic imaging techniques like computed tomography (CT), magnetic resonance imaging (MRI), mammography, nuclear medicine, or ultrasound in addition to x-rays.
Education Requirements
Candidates typically need to complete a certificate program or an associate degree in radiography from an accredited institution in order to become an X-ray technician, with these programs providing training specifically for taking x-rays and covering essential topics such as anatomy, radiation safety protocols and patient care procedures. These programs provide training specifically for taking x-rays while covering essential topics such as anatomy, radiation safety protocols, and patient care procedures.
Radiology technologists usually require more extensive education than X-ray technicians since their role encompasses several modalities beyond just x-rays; hence most pursue either an associate’s or bachelor’s degree in radiological technology from accredited institutions approved by the Joint Review Committee on Education in Radiologic Technology (JRCERT).
Certification and Licensing
Both X-ray techs and radiology techs need to obtain certification from the American Registry of Radiologic Technologists (ARRT). However, they may have different certifications depending on their specialization. For instance, an X-ray technician will hold a certification in Radiography (R), while a radiology technologist might have additional certifications such as CT or MRI.
Licensing requirements vary by state; however, most states require both professionals to be licensed before practicing independently.
FAQs
Is there a difference between radiology and radiography?
Yes, there is a significant difference between radiology and radiography. Radiology is the medical specialty that focuses on diagnosing and treating diseases using imaging techniques like X-rays, MRI, CT scans, ultrasound, and nuclear medicine. On the other hand, radiography involves producing these images through various technologies for interpretation by a radiologist.
What is so special about radiology?
Radiology plays an essential role in modern healthcare as it enables non-invasive diagnosis of numerous conditions without surgery or extensive testing. It allows early detection of diseases such as cancer or heart problems while minimizing patient discomfort. Moreover, interventional radiologists can perform minimally invasive procedures to treat specific ailments using imaging guidance.
Conclusion
Overall, Radiology and Radiography are two distinct fields in the medical industry. While both require knowledge of imaging technology, they differ in terms of education requirements, salary, and job responsibilities. Becoming a radiologist requires extensive schooling and training beyond that of a radiographer. Click the following link to learn how to improve quality of MRI images.
Google 3D Animals: Where to Find it, How to Use it and What Can it be Used For
Google 3D Animals have become a captivating and immersive way to explore the natural world from the comfort of our own homes. As technology progresses, it has become possible to bring animals into our living spaces through AR platforms like Google’s 3D Animals.
In this post, I will examine the features and implications of Google’s 3D Animals feature, its compatibility with different devices, how to access it, and how AR technology can be used to view animals in 3D. Lastly, I will provide information on which animals are currently available for viewing in Google’s collection as well as any additional apps or resources that may be useful for those interested in exploring animals in 3D even further.
What is Google 3D Animals?
Both adults and children enjoy looking at and studying the appearance and behavior of animals. However, they are usually found in the wild where they are difficult (or dangerous) to observe. With the advent of augmented reality, we can now bring these creatures to life in stunning detail.
Imagine being able to see a lion in its natural habitat, or a dolphin swimming through the ocean, all from the comfort of your own home. One of the most exciting aspects of 3D, AR, and VR is the ability to study animals up close and personal. By creating 3D models of animals, scientists can examine their anatomy in ways that were previously impossible. This has led to a deeper understanding of the animal kingdom. But 3D animals are not just for scientists. It’s also a great way for students to learn about animals in a fun and engaging way. By using augmented reality apps, students can interact with 3D models of animals and learn about their behavior, habitat, and more.
So whether you’re a scientist, a student, or just someone who loves animals, this is an exciting area that is sure to amaze and inspire. Google’s 3D Animals offers an exhilarating experience of viewing animals in a three-dimensional realm. Now let us take a look at what devices are compatible with Google’s 3D Animals. You can even see the way they move in nature and hear the sounds they make.
What Devices are Compatible with Google’s 3D Animals?
Google’s 3D Animals feature is designed to be accessible on a wide range of devices, ensuring that users can enjoy this interactive experience regardless of their preferred platform. Compatibility extends across both Android and iOS operating systems, as well as desktop computers.
Android Devices
To use Google’s 3D Animals on an Android device, you will need a smartphone or tablet running at least Android version 7.0 (Nougat). Additionally, your device must support ARCore, which is the augmented reality framework developed by Google for creating AR experiences.
List of Popular Compatible Android Devices:
-
Samsung Galaxy S8/S9/S10/S20 series
-
Google Pixel 2/3/4 series
-
OnePlus 5T/6T/7T series
-
Huawei P20/P30/Mate 20 series
iOS Devices
If you’re using an Apple product such as an iPhone or iPad, compatibility requires your device to run at least iOS version 11. Furthermore, it should support Apple’s ARKit technology – used for developing augmented reality applications on these platforms.
List of Popular Compatible iOS Devices:
-
iPhone SE (1st generation) and newer models
-
iPad Pro (all models)
-
iPad (5th generation) and newer models
-
iPad Air (3rd generation) and newer models
Desktop Computers
For those who prefer using a desktop computer, Google’s 3D Animals can be accessed through the Google Chrome browser. This allows users to view these interactive animals on their larger screens, providing an immersive experience without the need for additional software or hardware.
Google’s 3D Animals can be accessed on a multitude of platforms, making it simple for users to experience the world in three dimensions. With that said, let us now look at how one can access these animals on Google.
Downloading the Google Search App
To get started with viewing 3D animals using the Google Search app, follow these simple steps:
-
If you are using an Android device, visit the Google Play Store; if you are using an iOS device, visit the App Store.
-
Type “Google” or “Google Search” into the search bar and locate the official application.
-
Download and install it onto your device by following your respective store’s instructions.
How to Access Google’s 3D Animals?
Accessing Google’s 3D Animals is a simple and straightforward process that can be done on your Android, iOS devices, or even computers. Whether you are looking for an engaging way to learn about animals or just want some entertainment, follow these steps to explore the world of 3D animals:
-
Open Google Search: To start with, open the Google search engine on your device.
-
Type in Your Desired Animal: In the search bar, type the name of the animal you would like to view in 3D (e.g., “tiger”). Hit enter or tap on the search icon.
-
Select ‘View in 3D’: After searching for your desired animal, look for a result box titled “Meet a life-sized [animal] up close.” Beneath this title will be an option saying “View in 3D”. Tap on it to load the AR experience.
-
Allow Camera Permissions: If prompted by your device, grant permission for access to your camera so that Google can overlay its digital content onto real-world environments using Augmented Reality (AR).
-
Finding Space & Enjoying Your Experience.: Once permissions have been granted and everything has loaded correctly, point your phone at a flat surface such as a floor or table. The app will then project a life-sized version of that animal onto said surface. You can now move around and observe different angles while learning more about their features through accompanying information provided by Google.
- Interact with the virtual creature: Once placed successfully within AR space, feel free to move closer or further away from it while observing its realistic movements and features from different angles.
Note that if AR mode isn’t available on certain devices due to compatibility issues, users can still view the animal in 3D within a standard, non-AR environment. This option will be presented if AR mode is not supported.
Google’s 3D Animals feature offers an exciting and immersive way to explore various species up close, making it a valuable tool for educational purposes or simply satisfying one’s curiosity about the natural world. To learn more about augmented reality (AR) technology and its applications, visit this Wikipedia page.
If you’re interested in exploring other available animals within this feature beyond the one you initially searched for, simply return to the search results page and scroll down. You’ll find a carousel of additional 3D animals to choose from.
Google’s 3D animals provide an opportunity to experience wildlife in your own home, giving you the chance to discover and gain knowledge about different species from all over. In addition to Google’s 3D Animals, users can also explore other AR experiences within the app such as famous landmarks or even human anatomy. These features make it an excellent educational tool for students and professionals alike who are interested in scientific 3D animation and imaging.
What Can Google’s 3D Animals be Used For?
Some of the most common uses include:
-
Educational Purposes: Teachers and students can utilize this technology to study animals in-depth, providing a more engaging learning experience than traditional textbooks or images. By observing these creatures up close in augmented reality (AR), users gain a better understanding of their anatomy, behavior, and habitats.
-
Entertainment: As an entertaining pastime for both children and adults alike, Google’s 3D Animals allows users to interact with fascinating creatures from around the world right within their own homes. This immersive experience is perfect for those who enjoy wildlife documentaries or simply want to have some fun exploring nature virtually.
-
Presentation Enhancement: Professionals working in fields related to biology or zoology may find that incorporating these realistic models into presentations can help captivate audiences while effectively conveying complex information about specific species.
-
Creative Projects: Artists and designers can use Google’s 3D Animals as inspiration for creating lifelike illustrations or animations based on real-life examples. Additionally, they might serve as useful references when designing virtual environments featuring accurate representations of natural habitats.
To further enhance your exploration of the animal kingdom using AR technology, consider checking out additional resources such as educational apps like ZooKazam, which offer even more options for discovering new species through interactive experiences.
Beyond its applications within education and entertainment sectors, Google’s innovative approach also demonstrates the potential of AR technology in transforming how we perceive and interact with our surroundings. As this field continues to evolve, it is likely that similar tools will emerge, offering even more possibilities for immersive learning and exploration.
Google’s 3D creatures can be exploited for multiple objectives, ranging from educational to recreational. By exploring which animals are available in Google’s 3D library, you can determine the best way to use these resources for your needs.
Where Can I Download These Animals?
While it would be convenient to have the ability to download and save these 3D animals for offline use, unfortunately, Google’s 3D Animals cannot be downloaded. Instead, they can only be viewed through the Google Search app or by visiting their dedicated AR website. By not allowing downloads, Google ensures users always have access to the most up-to-date models and features.
What is 3D and AR?
In the world of technology, 3D and AR are two terms that have gained significant popularity in recent years. But what exactly do these terms mean? Exploring the concepts of 3D objects and Augmented Reality (AR) as well as their applications in education, entertainment, and scientific research will be discussed here.
The Concept of 3D
Three-dimensional, or simply 3D, refers to objects that possess height, width, and depth. Unlike traditional two-dimensional images which only have length and width dimensions on a flat surface like paper or screen, 3D models give us a more realistic representation by adding depth to the object. This added dimension allows for a better understanding of complex structures in various fields such as architecture, biology, engineering, etc.
List of some popular file formats used for storing 3D data:
-
.obj – Wavefront Object format
-
.stl – Stereolithography format
-
.fbx – Autodesk Filmbox format
-
.dae – COLLADA Digital Asset Exchange format
-
.ply – Polygon File Format / Stanford Triangle Format
A few examples where you can find free 3D downloadable files:
Augmented Reality (AR) Explained
On the other hand, Augmented Reality, or AR, is a technology that overlays digital content onto real-world environments using computer vision algorithms. This means that AR applications can enhance our perception of reality by adding virtual elements to it, such as 3D models, animations, and information displays. One popular example of AR technology is Google’s 3D Animals feature which allows users to view life-like animal models in their surroundings through their smartphones or tablets.
More animal resources
Below are some other websites where you can learn about the animal kingdom (not necessarily in 3D):
Conclusion
In conclusion, Google’s 3D Animals is a great tool for students and professionals to view animals in a unique way. It allows users to access various animals through compatible devices and view them in 3D or augmented reality.
With this technology, users can learn more about different animal species and their anatomy. For educational or recreational purposes, this technology provides a unique way to explore and learn about different animal species. Click the following link to learn the best websites for human anatomy.
Why Are 3D Printers So Unreliable?
Reliability is crucial in the field of 3D printing. 3D printing involves creating objects layer by layer, and any errors or problems in the process can result in an unsatisfactory print.
So, why are 3D printers so unreliable?
Calibration issues, wrong material selection, incorrect slicing settings, and incorrect bed leveling are some of the factors that can cause unreliability in 3D printers. 3D printers require proper calibration to function properly. If the machine is not calibrated properly, it can lead to problems with the quality and accuracy of the prints. Also, 3D printing devices require regular cleaning and maintenance to keep them working properly.
What are the factors that affect the accuracy of 3D printers?
Warping and shrinkage
Many factors can cause 3D prints to warp. The distortion of a part from its original shape is known as warping.
Much of 3D printing entails extruding liquid filament (melted material) from a heated 3D printer nozzle onto a heated print build plate or bed. The bed is a flat surface on which the printer creates an object.
The liquid turns into a solid when it comes in contact with the print bed. During phase shifts, 3D printing filament keeps its mechanical characteristics. They do, however, experience growth and contraction.
These are the ways that warping shows in 3D prints:
- Warped 3D prints are most obvious at the base layer, where they are exposed to a broad range of temperatures from the succeeding layers.
- Other layers may also warp due to the pull-up effect of the following layers as they cool on the cold layers.
- Warping can also be caused by a solid base layer that sticks to the 3D print bed.
What causes the 3D print to warp?
Below are some causes of warping you should be on the lookout for during 3D printing.
- Printing too fast
The following can result from printing too quickly and result in 3D prints that are warped:
- Plastic filament won’t lay evenly; it will curl.
- Rapid printing can also cause the layer to cool suddenly. Additionally, it will weaken the plastic layer.
- Wrong slicing settings
The slicer software chooses the best route for the 3D printer to follow in order to produce the desired object. This path is calculated depending on several factors, such as the preferred resolution, the kind of material being used, and the orientation of the object. If any of these settings are wrong, it can cause the object to become out of shape during 3D printing. Incorrect slicing settings can also make sections of the item come loose from the print bed. Additionally, the finished object may warp or be inaccurate as a result of these detachments. Therefore, before starting a print project, it is vital to make sure that all slicing settings are accurate.
- Incorrect print bed adhesion
The first layer of a 3D print needs to correctly attach to the print bed. If this doesn’t happen, the very next layer may contract and lift the preceding layer. This can then result in 3D prints that are distorted. There are several reasons why a bed doesn’t adhere properly:
- Dirty 3D print bed
- Inadequate extrusion
- Incorrect height of the nozzle
- Incorrect application or lack of adhesive
- Incorrectly leveled beds
- Temperature variations
The heated plastic thread expands and contracts during extrusion. Temperature variations can shorten or lengthen the expansion. A warped 3D print could result from the sudden cooling of the extruded filament.
This is the most frequent cause of 3D print warping and it happens because of improper 3D printing filament selection, inadequate cooling fan speed, non-uniform cooling, and inadequate airflow.
Materials used
The materials you use affect 3D printing accuracy in some ways. In many instances, improving particular material properties will necessitate compromising reliability. A regular SLA resin, for example, will result in components with better dimensional accuracy compared to a flexible resin.
You should use common printing materials like Ultem and Nylon for parts where high accuracy is essential.
Dimensional accuracy
The 3D printed parts should be dimensionally accurate if you are producing components that need to fit together or if you are producing vast assemblies.
Various factors can influence this accuracy like first-layer nozzle alignment, filament quality, and over or under extrusion. The success of your 3D prints depends critically on a 3D printer’s accuracy. It establishes how well the first layers can be laid down.
Calibration
Calibration can also affect the accuracy of a 3D printer. The 3D printer must be calibrated in order to create prints that adhere to the desired specifications. It needs to have many parts adjusted, such as the 3D printer filament type, the extruder, and the stepper motors.
The following are just a few benefits of calibrating your 3D printer:
1. A better grasp of your device
Calibrating your printer can help you develop a better grasp of your 3D printer. if you learn how to adjust it correctly, you’ll gain a deeper understanding of how your 3D printer operates and how to use it efficiently.
2. Increased control over the printing procedure
You can adjust the settings to get the desired print each and every time.
3. Improved efficiency
When calibrated correctly, your 3D printer can print more quickly and precisely. Your prints will be completed more quickly, allowing you to proceed to other tasks.
4. Less waste
When printing without calibration, the printer is unable to properly regulate the material flow, which can cause wastage or overuse. Through calibration of your 3D printer, each drop of filament will be utilized efficiently with no wastage.
5. Better print quality
If your 3D printer is calibrated properly, your prints’ quality will significantly improve. They won’t just be more precise; they’ll also be finished more smoothly.
Design
The accuracy will also be impacted by the item’s size. The dimensional accuracy of smaller objects is typically much better than that of bigger items. This is because there is less space for mistakes and they are simpler for the 3D printing device to print.
How to Fix 3D Print Warping?
Control the temperature
Controlling the temperature of the printer and its surroundings is one method to stop warping. Given below are a few steps to take:
1. Modify the cooling
Modifying the cooling for 3D printing can help to minimize warping by enabling the material to cool at a controlled rate.
The majority of 3D printers have a cooling fan that aids in keeping the material cool while it is being produced. Changing the fan’s direction and speed can help regulate the rate at which the material solidifies and cools, which can lessen cracking and warping.
2. Print in a fully enclosed print chamber
Printing in a closed chamber can help to decrease warping in 3D printing by keeping a constant temperature around the material being printed and the machine. A printing enclosure aids in preventing temperature changes that could cause the material to cool at varying rates, resulting in warping.
3. Use a heated print bed
Using a heated print bed is a great way to minimize warping in 3D printing. A heated bed aids in temperature control and can stop the material from cooling and contracting too rapidly, which can result in warping.
Below are some tips for using a heated print bed:
- Warm the bed: Be sure to pre-heat the build plate to the proper temperature for the material you’re going to print. This will help to ensure that the material will be at the ideal temperature when it is placed on the bed.
- Use the proper bed temperature: Different materials require varying temperatures, so make sure to adjust your build plate’s temperature appropriately.
Improve 3D printer bed adhesion
Good bed adhesion is essential for avoiding warping during 3D printing. Here are some of the ways to improve 3D printer bed adhesion.
1. Adjust the level of the build plate
Some 3D machines feature an auto bed leveling system, which uses a sensor probe to measure the height of the build plate at different points and adjust the build plate height as necessary. However, if your 3D printer does not have this feature, you can physically level the build plate using the machine’s adjustment screws.
An unlevel bed frequently causes print quality problems, such as ruined prints or warping, which results in a loss of resources, such as time and material.
2. Clean the build plate
Your build plate needs to be thoroughly cleaned to get rid of any adhesive left over from previous use. Doing so will prepare the build plate for the next print, and bed adherence will be enhanced.
3. Use the right adhesives
Using the right adhesive, such as hairspray or glue sticks, will ensure the item remains attached while it cools down. This will lessen the possibility of warping.
I hope this article was helpful in understanding why 3d printers can be unreliable and some solutions to make them more reliable. Click the following link to learn if 3d printers are hard to use.