
Mastering point cloud to 3d model conversion can feel like translating whispers from another dimension into vivid sculptures. You’ve got this cloud of data points, a chaotic concert of coordinates captured by laser scanners or photogrammetry—imagine converting that into a digital statue so real it could pass for its physical twin.
You’re about to get your hands dirty with surface reconstruction techniques and CAD compatibility. Picture taking those small, scattered points and crafting them into something you can not only see but utilize in medical animation projects or virtual reality applications. We’ll talk file types, alignment processes—the works.
The leap from raw scans to polished models is huge; think of turning static noise into symphonies! By the end, expect a solid grip on creating meshes that fit right in at any animation showcase or VR design room.
Understanding Point Cloud Data and 3D Modeling
If you’ve ever been mesmerized by the lifelike models in a VR simulation or marveled at the virtual reconstruction of an anatomical structure, chances are you’ve witnessed the power of point cloud data turned into 3D models. But what exactly is this technology that’s shaping everything from construction projects to visualization experiences? Let’s peel back the layers.
What is a Point Cloud and How Does it Relate to 3D Models?
A point cloud is like a crowd where each person represents a data point gathered by laser scanners during scanning processes. These points capture not just positions but also attributes like color (rgb data), which can give life to every nook and cranny of an object or space. Imagine capturing every detail down to sharp edges on furniture or local surface variations on walls – that’s what these clouds do before they become part of your building model. They can be a result of scans of an environment surrounding the scanner or of an object.
The magic happens when these small points unite through sophisticated algorithms; we get more than just isolated dots—we create complete point clouds ready for transformation into intricate digital twins with real-world applications.
The Role of Surface Reconstruction in 3D Modeling
To create something usable from scattered dots requires reconstructing surfaces out of chaos—and this isn’t just waving a wand over your data set. It involves computational sorcery known as algorithms which make sense out of noise within the scalar field surrounding each dot. This reconstruction bridges gaps between discrete points so smoothly that what emerges resembles life-like contours rather than rigid geometries.
In technical terms: local surface patches get generated around each data spot until they merge into one continuous mesh file—a bit like knitting with pixels instead of yarn.
Fine-Tuning Your Conversion Process
-
Select Quality Software: You want software capable enough for heavy lifting without crashing under pressure (or massive file sizes).
-
Clean Up Your Data: Before diving headfirst into conversion land, sift through those scan results. Get rid off any outliers because accuracy matters big time when constructing anything—from design processes within construction projects down to capturing every nuance at an archaeological dig site.
-
Determine File Types Needed: Knowing whether you’re outputting an e57 high-density point cloud file or another format compatible with your end use will save headaches later on during project delivery stages.
-
If you’re tackling datasets that are a bit rough around the edges, keep an eye out for dialog boxes suggesting machine vision processing options. These might offer automated smoothing features to help polish your data.
The Importance of Point Cloud Registration
Imagine trying to piece together a jigsaw puzzle, but every piece is from a different box. That’s kind of like what point cloud registration tackles in the 3D world. It’s not just about slapping data sets together; it’s an art form that requires precision and patience.
Why Accurate Alignment Matters More Than You Think
So you’ve got your raw point clouds—thousands or even millions of tiny dots representing a physical space. Now comes the crucial part: getting them all to line up perfectly through point cloud registration software. Without this step, you might as well be drawing with crayons on napkins. We’re talking millimeter-level accuracy here because if those points are off by even a smidge, your final model will look more funhouse mirror than technical marvel.
To nail down that alignment process, professionals use everything from automated algorithms to manual tweaks—kind of like tuning an instrument until it hits the perfect pitch. And don’t forget about registration targets. These are like breadcrumbs left for Hansel and Gretel (your software) so they can find their way home (aligning each scan accurately).
Digging into Data Sets
You’d think with today’s tech wizardry any Joe Schmo could press ‘Go’ and end up with crisp 3D models faster than microwave popcorn pops. But hold your horses—it ain’t that simple. High-quality scans need some TLC before becoming something useful for construction projects or virtual reality applications.
We have our heroes in this saga—the wizards wielding powerful point cloud processing software. This stuff can stitch together chunks of data captured at different times, angles—you name it—to produce one coherent picture without breaking into cold sweats over things like data latency issues.
Tools and Software for Point Cloud to 3D Model Conversion
Finding the right tools and software can be like looking for a needle in a haystack. But when it comes to converting point clouds into 3D models, especially with CAD compatibility in mind, you don’t want just any old needle; you need the sharpest one out there.
CAD Software: The Heart of Model Creation Tools
If you’ve ever felt like constructing a building model from cloud data is as complex as piecing together an ancient artifact, then CAD software might just be your Indiana Jones. It’s not enough that these programs handle design process challenges—they have to do it with style (and precision). From AutoCAD’s well-known prowess in drafting detailed designs to Revit’s skill at handling technical projects seamlessly, quality software brings much more than simple conversion capabilities; they are central players in making investment decisions and driving construction projects forward.
Think about it: would you trust a simulation character built on shaky graphics? Probably not. Likewise, engineers and architects lean heavily on robust CAD applications that transform cloud points into sharp edges and tangible surfaces. A quality piece of CAD software, therefore, must marry power with finesse—much like how a video card marries computing power with performance gain.
The Magic Behind Mesh Surface Generation
Moving beyond mere points scattered across digital space requires meshing—a bit like knitting everything together without missing any stitches or small points. This is where tools such as MeshLab come into play, which let users convert point clouds by weaving every tiny dot into local surface patches smoother than butter on bread. And while this sounds dreamy indeed, a mesh file resulting from such intricate work doesn’t pop up overnight—it demands serious muscle under its hood (we’re talking about computing power here), typically provided by machines equipped with heavyweight GPUs that laugh in the face of data latency issues during heavy rendering tasks.
Enhancing Productivity in Point Cloud Processing
If you’ve ever felt like you’re slogging through a swamp when working with massive point cloud datasets, I feel your pain. But what if I told you that with the right hardware setup, we could turn that swamp into a freeway? It’s all about getting those productivity gains by beefing up our systems to handle large-scale data without breaking a sweat.
Advanced Hardware: The Secret Sauce for Speed
The first step toward speeding things up is looking under the hood at our computing power. When it comes to handling complex cloud files, think of your CPU as the brain and your video card as the muscle; both need to be top-notch. A processor with turbo clock speeds will breeze through data-heavy tasks while an upgraded graphics card ensures smoother visualization experiences—essential when dealing with construction projects or virtual reality applications.
A quality software also plays its part here because let’s face it, not every knight needs just any old sword; they need Excalibur. High-performance point cloud processing software can slice through dense scalar fields faster than light travels through space. Imagine aligning multiple scans from laser scanners seamlessly using powerful point cloud registration software—like fitting puzzle pieces together but on steroids.
Leveraging File Types and Conversion Tools
We often underestimate how file types impact performance gain—but guess what? They’re key players in this game. Large e57 files may contain rich RGB data but converting these heavy hitters into formats compatible for CAD use can save time and improve efficiency dramatically during design processes.
Moreover, investing in tools capable of creating complete point clouds helps avoid spending hours manually stitching small points together—a task as tedious as watching paint dry. Converting those neatly aligned clouds into crisp mesh surfaces should then be just another walk in the park—or rather another click in options dialog boxes—to get us closer to producing high-quality 3D model deliverables without any fuss.
Tapping Into Software Capabilities for Sharper Results
Moving past hardware and file types, let’s talk about local surface details—the sharp edges on models which make them stand out. Here’s where machine vision processing steps onto center stage. By employing algorithms designed specifically for detecting nuances within cloud points such conversions ensure no detail goes unnoticed making sure everything looks picture-perfect even down to individual bricks or stones.
This kind of attention-to-detail translates directly into better viewing experiences whether it’s someone walking around their future home via VR before ground is broken on their construction project or gamers exploring new worlds filled with adventure. By delivering rich, immersive environments, we’re setting a new standard for what’s possible in virtual spaces.
Applications of High-Quality 3D Models from Point Clouds
When you hear ‘point clouds,’ think about the bedrock for high-quality 3D models that transform industries. But it’s not just about collecting these tiny dots; it’s what we do with them that counts.
Revolutionizing Construction Projects
The world of construction projects is bidding farewell to traditional blueprints and hello to 3D model deliverables derived from cloud data. Imagine being able to walk through your building model before even one brick is laid. With advanced point cloud processing software, architects can now convert point cloud data into detailed structures, revealing sharp edges and local surfaces in stunning clarity. This isn’t sci-fi—it’s happening right now, slashing project timelines and boosting client confidence like never before.
Gone are the days when small points were overlooked during design processes. Today’s technology lets us capture every nook and cranny with complete point clouds so comprehensive they leave no stone—or should I say pixel—unturned.
Elevating Machine Vision Processing
In an era where precision means everything, machine vision processing leans heavily on converted cloud files for its eye-like accuracy. Quality software taps into computing power previously reserved for space missions—and yes, I’m looking at you turbo clocked graphics card—to analyze e57 file types packed with scalar fields representing reality down to the last detail.
This meticulous visualization experience has vast implications—from ensuring your morning coffee cup doesn’t come off the production line looking like abstract art to enabling robots in warehouses navigate as smoothly as tourists using GPS through ancient cities.
Crafting Virtual Realities
If virtual reality applications make you think of awkward headsets showing fuzzy pictures—you’re behind times by a light-year or two. Now imagine strapping on goggles that transport you inside a photorealistic rendering powered by meshes crafted from high-resolution point clouds. We’ve made strides where virtual textures feel almost tangible thanks primarily to sophisticated mesh surface algorithms translating raw cloud points into immersive worlds more real than your pizza delivery guy insisting he got there in under thirty minutes (we know he didn’t).
Fueling Video Game Development Adventures
-
Create breathtaking environments based on actual geographic locations,
-
Sculpt characters down their facial expressions,
-
Rig complex movements reflecting true-to-life physics—all courtesy of converted point clouds delivering unprecedented fidelity.
FAQ
How to convert point cloud data to 3D model?
To transform point cloud data into a 3D model, use software like AutoCAD or MeshLab for meshing, refining, and exporting.
How do I import point cloud into plant 3D?
In Plant 3D, go to the Insert tab. Click Point Cloud. Attach your .rcp or .pcg file. Then position it right.
How do I convert point cloud to mesh?
Pick conversion software that suits you best. Load up your points; hit ‘mesh generation’. Tweak settings as needed for detail.
How do I turn a point cloud into a Revit model?
Add the scan by linking in a new Point Cloud project through Revit’s ‘Insert’ tab—prepares groundwork for modeling accurately.
Conclusion
So, you’ve journeyed through the process of how to do point cloud to 3D model conversion. You’ve seen how raw data transforms into detailed structures, and why precise alignment in registration is crucial for a true-to-life result.
Dive deep into software choices; they’re your trusty sidekicks. Remember that CAD compatibility can make or break your design flow. Grasp these tools well—they’re the key to unlocking potential in construction projects and beyond.
Power up with hardware that matches your ambition; it’ll speed up work on large datasets like nothing else. This isn’t just about faster computing—it’s about unleashing creativity without waiting on data latency.
Your final takeaway? Converting from clouds of points to solid meshes opens doors—think heritage showcases, video games, virtual reality realms. The leap from scan to sculpture isn’t small—but now you know it’s entirely within reach. Click the following link to learn how to do 2d drawing to 3d model conversion.
How to Do Drawing to 3D Model Conversion
Let’s say you’ve got a drawing, something you sketched out during a burst of inspiration, and now you’re itching to see it leap off the page into three dimensions. Well, that’s exactly what I did with my first squirrel character design; brought it to life through 3D modeling from just a simple sketch on a napkin.

I remember sitting down with my trusty pencil and paper, creating curves and lines that felt alive. Fast forward through learning the ropes of turning a drawing into a 3d model, and there was my creation—textured and rotating on screen. This is where we step up our game from flat images to dynamic models ready for animation, education, gaming or even 3D printing.
In this piece, I’m unpacking every stage: picking user-friendly software—even if CAD sounds like another language right now—and understanding file formats like STL and OBJ so your work translates smoothly across platforms. Plus, I’ll dive into some nifty advanced techniques that will take your designs to the next level. Whether you’re a beginner or looking to polish your skills, these insights will help you master the craft of 3D modeling.
Transitioning from Sketch to 3D Model: The Basics
From Paper to Pixels: Understanding the Transformation Process
The journey from sketch pad to screen is all about translating your two-dimensional vision into a three-dimensional masterpiece. But before we get our hands digitally dirty, let’s talk basics. You start with an idea drawn on paper—or perhaps on one of those nifty tablets—and then use design tools that help bridge worlds; this means turning flat images into workable models in CAD software.
2D can include drawings such as blueprints which can be extruded to varying heights for technical 3d models or sketches of objects such as people or cells that we need to turn into 3D.
We need more than just guts and gusto here—we need precision. So while anyone can scribble up something on paper, creating detailed sketches complete with height dimensions will give us leg-up when we hit the virtual ground running.
Your trusty sketch should include different angles—think front-on views paired with side profiles—to provide reference points once we’re deep within modeling territory. Height lines matter too because they act as guides for extruding shapes in 3D space—a fancy way of saying “pulling out” your design like until it looks right.
Selecting Software for Your Drawing-to-Model Journey
CAD Powerhouses: Industry-Leading Software Options
When you’re stepping up from paper sketches to digital marvels, the right CAD software isn’t just a choice; it’s your gateway to bringing creations to life. Now, imagine this: you’ve got a drawing scroll unfurled on your desk – maybe it’s of an intricate human anatomy character or an elegant medical design piece. You need power and precision to turn that 2D dream into a 3D reality.
A heavyweight in the ring of modeling is AutoCAD. With its robust toolset and DWG file compatibility, it’s like having a Swiss Army knife at your fingertips for model-based design work. Then there’s SolidWorks – think of it as the chess grandmaster in engineering circles with sheet metal bends and curve networks all part of its strategic game.
If those options sound like they carry quite the price tag (and they do), don’t fret. There are also cost-effective champs such as SketchUp that still pack a punch with user-friendly interfaces ideal for architectural wonders where height dimensions matter most.
Feature-Rich Tools for Enhanced Design Precision
Diving deeper into specifics, some tools stand out not only because they play well with various file formats but because their feature set makes them invaluable allies in our quest from sketch geometry to tangible objects created within 3d space.
Rhinoceros sets itself apart by being able not just handle NURBS curves gracefully but allowing real-time collaboration across teams – essential when each member brings unique expertise onto the virtual table. Meanwhile Blender flexes its muscles through grease pencil tools which allow artists freedom akin sculptors shaping clay; speaking of which Blender includes snake hook brushes too giving one true sculpting capability without leaving home base meshes behind.
Fusion 360 might be another ace up your sleeve if complex machinery is what you are looking for or TinkerCAD if dipping toes into the waters of modeling techniques feels more comfortable initially.
File Formats Demystified in Drawing-to-Model Conversion
Navigating Through Model File Formats
If you’ve ever felt like you’re wading through alphabet soup when trying to convert your drawings into 3D models, you’re not alone. The variety of file formats can be overwhelming, but they are essential for ensuring that your designs transition smoothly from concept sketches to usable digital assets that can be used in animations or visualizations and edited.
Different software platforms prefer different snacks from this buffet of file types. For instance, if CAD is your playground, DWG files will often be the bread and butter of your design process; it’s the go-to format for many precision-based applications. However, when it comes time to bring these designs into a more sculptural space or perhaps even prepare them for 3D printing, STL files become the stars of the show with their mesh-based language that speaks directly to 3D printers.
But let’s not forget about OBJ files – think of them as universal translators between various modeling tools. They hold vertex information along with texture maps and are particularly friendly with a multitude of rendering and animation packages. So whether you’re aiming for Pixar-level character design or medical device visualization realism, OBJs help bridge gaps between creative ambition and technical execution.
Ensuring Compatibility Across Drawing and Modeling Platforms
Making sure our artistic endeavors play nicely across various platforms means keeping an eye on compatibility without losing sight of quality.
A common starting point is converting traditional hand-drawn sketches or vector art into something tangible within 3D space using drawing tools available in software such as Blender’s Grease Pencil feature which turns lines into life-like forms ready for manipulation within its environment. This magic act transforms flat images into height dimension data points so objects can strut around confidently in three dimensions rather than just two—a bit like adding pop-up features to what was once just a regular old book page.
To streamline real-time collaboration during this dance between dimensions—and trust me; coordination here is key—formats such as DXF files allow seamless exchange among teams who may use varying design programs ranging from AutoCAD marvels to SketchUp gems.
With free-form modelling techniques burgeoning within fields like biological research (yes I’m looking at those researchers needing intricate anatomical models), understanding how each other plays nice becomes critical. If we don’t, we risk creating inefficient systems that can hinder progress across various disciplines. It’s about ensuring compatibility and fostering collaboration so that innovation can thrive without the constraints of technical limitations.
Sketch-Based Modeling Basics
We have two options, extruding a 2d blueprint using one of your software’s many extrude tools to whatever height is needed, or importing your sketches and lining them up in your orthographic views in a program like Blender or Maya, and then modeling from those views by drawing curves in orthographic views using some version of snap tool (I will not go into details here as its different for different programs) and then modifying those curves in 3D followed by creating a 3D surface from them.
Advanced Techniques in Sketch-Based Modeling
From Lines to Life: Curve Networks in Drawing to 3D Model
Imagine your sketch as a web of roads, each line guiding the journey from flat art to full-bodied forms. This is where curve networks become pivotal. In the advanced modeling workflow, artists and designers employ these paths as scaffolding for their digital creations.
The process starts with an image file or a hand-drawn sketch—think of it like your favorite drawing scroll filled with intricate designs. Software capable of interpreting these lines converts them into vector art; this sets the stage for transforming those curves into spine-like structures that define the shape’s surface in 3D space.
Adept at handling such tasks are CAD powerhouses like Autodesk Maya or Blender with tools such as Quad Draw, which let you draw directly onto a virtual canvas and create complex curve networks on-the-fly—a method favored by concept artists who need both precision and flexibility.
Elevating Imagery: Depth Map and Height Map Integration
You’ve probably seen topographical maps showing mountains’ highs and valleys’ lows—the same principle applies when adding dimensionality to sketches using depth map and height map techniques. By assigning different shades of gray representing various elevation levels within an image file, 3D software can interpret these nuances to craft textured surfaces that pop out from your screen.
This tech talk might sound like rocket science, but picture yourself playing with shadows on a sunny day; how they deepen around objects creates contrast—that’s essentially what you’re doing here but digitally. Tools like ZBrush offer sculpting capability where you paint grayscale images right onto models, manipulating heights almost magically before your eyes.
Beyond artistic endeavors, imagine applying this technique while working on research papers detailing biological organisms—you could generate realistic textures for tissues or organs starting merely from annotated drawings.
Crafting Dimensions: Masterful Manipulation Tools at Work
Drawing tools have come a long way since Paint 3D popped up letting us all play Picasso with pixels. Today’s design programs serve up powerful manipulation tools allowing one not just to convert drawings into base meshes but also refine every nook and cranny until perfection is met—or until we hit deadlines anyway.
Conclusion
Turning sketches into 3D models isn’t just a trick; it’s a skill. You’ve learned how to do drawing to 3d model conversion, starting with the basics and moving through software selection. You’ve got the tools now, ones that can turn flat drawings into dynamic creations.
Create something incredible from mere lines on paper. Use curve networks for complexity, depth maps for detail, advanced workflows to refine your vision. I hope you found this article useful. Click here to learn the different types of drawing curves in 3D programs.
FBX to OBJ File Conversion- Can It be Done?
Imagine this: you’re knee-deep in a 3D modeling project, and you find yourself needing to convert an FBX file to an OBJ due to limitations of the format or it not being accepted somewhere. The world of 3D design can be as complex as it is captivating. File formats like FBX and OBJ are part of that intricate web.
In this post, we’ll not only unravel what these file formats mean but also guide you through converting your digital content creation from one format to another effortlessly. You’ll learn about online converters that change fbx files into geometry definition file format – or OBJ if we stick with our jargon.
Understanding the FBX and OBJ File Formats
The realm of 3D modeling has a wide range of file formats to pick from. Two popular file formats that stand out are Filmbox Interchange File (FBX) and Geometry Definition File Format (OBJ). These two giants have carved their niche in the digital content creation realm due to their unique features.
FBX, short for Filmbox Interchange, was originally developed by Kaydara for MotionBuilder but has now gained immense popularity across different content creation applications. This format boasts support for geometric data, texture vertices, free-form geometry among other advanced features like animation – something not every interchange file offers.
On the flip side is OBJ, or Object files were originally developed as part of Wavefront’s Advanced Visualizer application suite. These ASCII-based files specialize in polygonal geometry definition. The OBJ format shines when it comes to representing complex geometric objects with an impressive degree of precision.
An Overview: FBX vs OBJ Files
The decision between using FBX or OBJ often boils down to your project needs. If you’re dealing primarily with static models without much need for animations or special effects – then OBJ might be your best bet because it’s known for its simplicity and broad compatibility.
If you’re working on more dynamic projects involving animations though, FBX may serve better since this powerful filmbox interchange supports both skeletal animations and scene hierarchy – essentially making life easier if you’ve got moving parts.
A Deeper Dive into Features
Both FBX and OBJ have their strengths. The FBX format’s support for a wider range of data types, including cameras, lights, animations, and more makes it a versatile tool in 3D modeling.
However, the simplicity of OBJ files is often preferred by designers working on less complex projects or those needing to share models across different software platforms. Because OBJ is such an open format (it’s just text), you can even edit it directly with any text editor.
Even though they may appear quite different initially, these two popular choices actually share some similarities.
Advantages of Converting FBX to OBJ
Switching your 3D file formats from FBX (Filmbox Interchange File), a popular format for high-fidelity and complex animations, to OBJ (Geometry Definition File Format), renowned for its simplicity and wide compatibility, can offer numerous benefits.
The Gift of Compatibility
The first advantage is all about ease-of-use. When we convert an FBX file into an OBJ format, it becomes easier for us to share our work with others or switch between different content creation applications without worrying about compatibility issues. The reason? Simple – the OBJ file has been around since Wavefront’s Advanced Visualizer application days; hence it enjoys wider acceptance across platforms.
This feature gives users flexibility in their choice of digital content creation tools because they’re no longer restricted by software that only supports specific file formats.
Simplicity Equals Accessibility
In addition to compatibility advantages, converting your files from FBX format also simplifies things on a technical level. As opposed to dealing with intricate details such as animation data or other elements included within FBX files, the Geometry Definition File Format strips down these complexities and focuses primarily on geometric objects and texture vertices information.
This makes it easy not just for professionals but even beginners who are dipping their toes in free-form geometry manipulation using digital content creation applications like Blender or SketchUp. In essence, making a shift towards simplicity helps increase accessibility among novice creators while still being valuable for seasoned artists.
Fine-tuning Your Craft: Flexibility in Editing
Last but not least is the aspect of editing flexibility which again ties back nicely into usability. Because OBJ is a text-based file, it allows for manual edits directly in the file. This means you can tweak vertex data or adjust texture coordinates right from your favorite text editor if needed.
So, if you’re making a captivating VR journey, designing 3D elements for video games, or creating eye-catching visuals for architectural tours – switching FBX files to OBJ format is beneficial. Converting FBX to OBJ can make your process easier and improve the outcome of your project.
Online Tools for Converting FBX to OBJ
Switching between file formats is a common task in 3D modeling. In this scenario, we’ll focus on converting an FBX file, or Filmbox Interchange File, to an OBJ format – the Geometry Definition File Format. Take a peek at some online resources that make the transformation from FBX to OBJ easy.
Using GroupDocs for Conversion
GroupDocs is one handy tool you can use for your conversion needs. It allows you to change your FBX files into OBJ files with just a few clicks, and it works on any platform – Windows, Mac OS, or Linux.
This converter lets you upload and convert multiple files simultaneously, which makes it great if you’re working with complex projects involving numerous models.
You don’t need any software installation as everything happens right in your web browser. After choosing the desired output format (in our case, OBJ), all that’s left is hitting the ‘convert’ button and waiting until the conversion completed message appears.
Utilizing AnyConv for Conversion
Apart from GroupDocs, there’s another useful online tool called AnyConv. This user-friendly converter gives even beginners easy access to content creation applications by offering intuitive exchange format conversions, including changing FBX into Wavefront’s Advanced Visualizer application supported format – OBJ.
To start using AnyConv, follow these simple steps: Click ‘Choose File’, find your FBX file, then hit ‘Convert’. Once the OBJ file is converted, the download link will be available instantly.
An added bonus of using AnyConv? They prioritize users’ privacy by deleting uploaded files after 24 hours. Now, that’s peace of mind.
Both these tools support the conversion of free-form geometry and polygonal geometry defined in FBX to OBJ format, which includes texture vertices and geometric data among other things. Just a few clicks and your FBX file transforms into an ASCII format like OBJ, making it easy to use for digital content creation applications across the globe.
Using Aspose for Conversion
Aspose is another online tool for this type of file conversion. It is similar in many aspects but it does take a longer time for the conversion. It also only stores files for 24 hours for privacy.
To convert using Aspose, all you need to do is drag and drop your FBX file, choose OBJ format and click Convert. Its really simple.
Software Tools for FBX to OBJ Conversion
Moving onto more specialized software tools that handle file conversions like Autodesk’s very own FBX Converter toolset among others. These come packed with advanced features supporting animation details along with geometric data inherent in 3D models stored within an FBX file format.
The beauty of such tools lies not just in their ability to convert fbx files efficiently but also preserving crucial attributes during conversion completed successfully – something that gives them a leg up over simpler web browser based converter options when dealing with complex digital content creations requiring high fidelity reproduction across exchange formats.
- You’ll need to first download the tool, follow the installation instructions for your Mac OS or Windows system.
- Once installed, you can simply add file(s) into its interface. The converter will automatically recognize and list all FBX files ready for conversion.
- Select OBJ as your output format then click ‘Convert’ button – it’s that simple.
You’ll find several software applications that can help change your FBX files into the more flexible OBJ format. Here’s a list of reliable software solutions worth considering:
Autodesk’s FBX Converter
This tool lets users quickly and effortlessly convert their 3D model files from one type to another. With Autodesk’s converter, changing your FBX file into an OBJ format is straightforward and user-friendly.
Blender
Blender is a well known and respected 3D modeling tool which is free. It doesn’t have all the modeling and animation features as Maya for example but many people use it for their projects. You can get it here. The process is again simple. Go to File/Import/FBX and then to File/Export/ OBJ.
FAQs
Can FBX be converted to OBJ?
Absolutely. Online converters let you change your 3D files from FBX format into OBJ with a few clicks.
Should I use FBX or OBJ?
This depends on your project’s needs. While FBX is robust for complex animations, OBJ shines when simple geometric shapes are in play.
How to export 3ds to OBJ?
To turn a 3DS file into an OBJ one, use online conversion tools that support this specific transformation and follow the provided instructions.
What is an FBX file?
An FBX file is a popular proprietary type used widely in the world of 2D/animation software such as AutoDesk’s MotionBuilder and Maya programs.
Conclusion
Unravelling the complexities of 3D design can be a challenge, yet you have acquired the knowledge to transition from FBX to OBJ and embark on an exciting journey in digital content creation.
Remember, it’s all about understanding file formats. The knowledge you’ve gained today doesn’t just stop at fbx to obj conversion; remember these online converters support other exchange formats too. Click the following link to learn how and why to convert STL to OBJ.
Top Picks: Best 3D Model Character Creators
Picture yourself sculpting a 3D character, one vertex at a time for a medical animation or visualization, when you cannot just download an existing 3D model for whatever reason. Not something you want to be doing especially on a tight deadline. You would rather be focusing on the animation part and getting your message across.
In this article we will be diving into the world of 3d model character creators. It’s an area where polygons and pixels meet creativity, giving life to virtual beings while allowing them to be customized to your needs. This isn’t just for pros with years under their belts—novices stepping into this digital playground have plenty to gain. You’ll discover tools like MakeHuman that let you craft human figures without breaking a sweat, Daz Studio which opens up realms of possibility with no hit on your wallet.
We’re not stopping there though. Get ready to learn about web-based wonders such as Autodesk Character Generator which streamlines the creation process right from your browser. So buckle up; it’s going to be an enlightening ride through the landscape of creating compelling 3d character models.
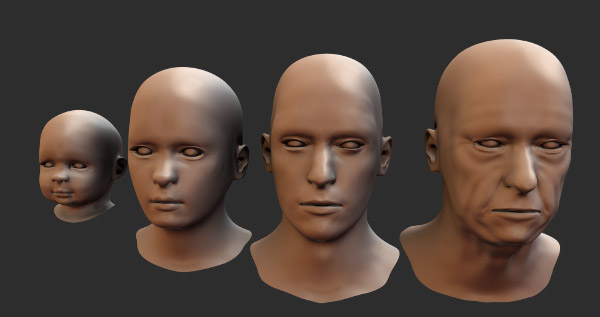
Creating 3D human models has always been a source of frustration in traditional 3d modeling. Not only did you need to know how to model very well, a 3D human is one of the hardest things to model, being that we are so used to recognizing flaws, seeing one in the mirror every day. This translates to days if not weeks of modeling, especially if we need to model detailed anatomy for a medical piece. While some of the 3d character creator programs may not provide you with perfect anatomy you need for an animation or interactive VR piece, they will save you countless hours of work, and if needed you can add specific details to the existing model later.
Top Picks for 3D Model Character Creators
Creating a standout human 3D character is no small feat. It takes not just creativity but also powerful software to bring these characters to life. So, what are the gold standards in this high-stakes world of pixels and polygons? Let’s peek behind the digital curtain.
MakeHuman – The Open-Source Revolution in Character Modeling
In an arena where complexity often equals cost, MakeHuman steps up as a hero offering open-source character creation software with capabilities that could rival David against Goliath. For artists on a quest to create realistic human figures without getting entangled in intricate interfaces or steep learning curves, MakeHuman might be their Excalibur. With 1170 morphings available for parametric modeling, you can tweak and twist your virtual humans into virtually any shape imaginable.
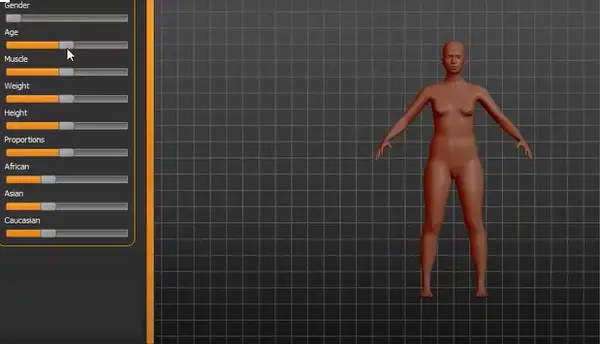
This versatile character design tool lets you play god with facial features down to the tiniest detail—without spending divine amounts of cash because it’s free. Plus, if you’re looking to export your newly crafted Adam or Eve into other software, MakeHuman has got your back. This feature allows seamless integration into more complex environments when it’s time for your creations to level up.
This program allows you to create everything from skin to hair, teeth, eyelashes, skeleton and even pose. It also allows easy export into 3D modeling software such as Maya, 3DSMAX, Blender or Unreal Engine including joints.
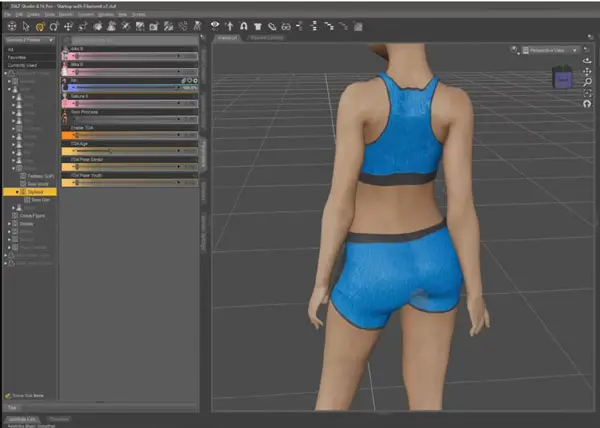
Daz Studio – Unleashing Creativity with Intuitive Design Tools
Daz Studio lets you customize your 3D character with adjustments to anything from facial features, eyes, cheekbones, etc to your specific needs. You can even morph between characters and make hybrids, or use a slider to age your character. You can start with already built human assets such as models and poses from their online store or build your own. You can mix poses to obtain an original one.
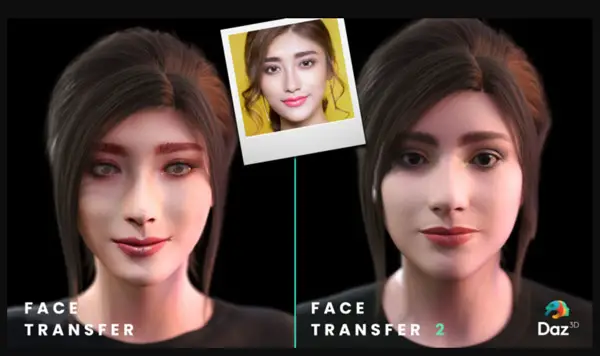
Daz Studio even features AI based face transfer using a photo of a real person in the creation of a 3d character, which is a next level time saving feature for photo realistic modeling and texturing. The level of accuracy is a game changer for models where you need to capture an actual patient or specific facial features to be shown in an animation of a condition or disease.
You can even purchase muscle maps for your model to utilize in animations or use as reference.
Daz 3D also allows export of your created model to other 3D programs such as Maya, Blender, Unreal Engine, Unity, 3DSMAX and Cinema 4D for further refinement and animation.
With our two contenders presented above being strong allies in anyone’s creative arsenal—whether they’re indie developers carving out their niche or seasoned pros refining their craft—it seems we’ve barely scratched the surface when considering options among best 3D model character creators.
ZBrush – Sculpting Characters to Life with Precision
Picture this: you’re an artist in the digital realm, your canvas is a screen and your brush is ZBrush, a sculpting tool that’s become the gold standard for crafting 3D characters. The powerful tool at your disposal has transformed character creation into an art form where every stroke adds depth, life, and emotion.
While Zbrush is not a dedicated quick 3d character creation platform, it is faster due to its clay modeling approach and several other intuitive approaches to human character creation than traditional 3d modeling packages.
Zspheres allow you to draw a skeleton quickly and the program then builds a skin around it. Its an artistic, faster approach to pushing and pulling vertices or extracting edges.
Zbrush works flawlessly with other 3D packages such as Maya for export of your model and you can even transfer your character model back and forth between the programs to speed up your workflow. It also integrates well with texturing and other software, and has its own intuitive texturing module which eliminates the traditional need for Uvs and time consuming texture creation. You can project photos of a persons face onto your model and save it as your texture.
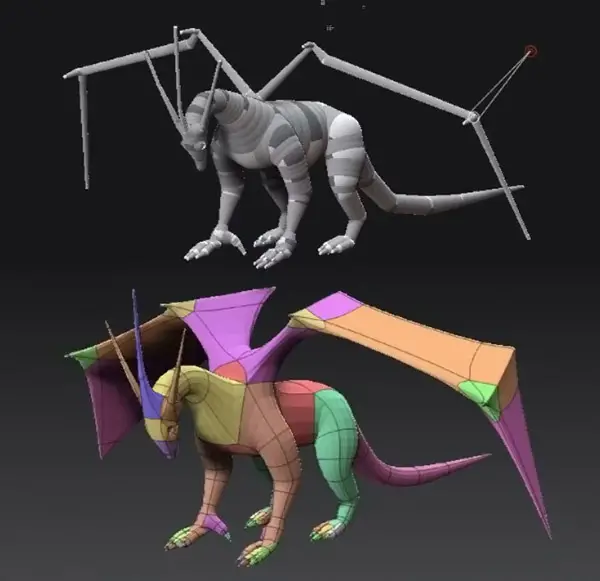
How ZSpheres facilitate rapid base mesh generation for intricate sculptures within ZBrush
The journey of bringing virtual beings to life starts with a skeleton—the basic structure—and that’s where ZSpheres come in handy. Think of them as digital balloons that you can inflate, shape, and connect to block out the rough silhouette of your soon-to-be masterpiece. They are incredibly efficient for establishing proportions without getting bogged down by technicalities early on. With these dynamic spheres, artists can quickly whip up a base mesh which acts like the backbone supporting all subsequent layers of detail—quite literally giving form to their vision with speed and precision.
Intricate sculptures demand not just creativity but also control over minutiae; something professional tools like ZBrush offers through its advanced brushes and features designed specifically for fine-tuning those details. Once satisfied with the overall shape created using ZSpheres, one transitions seamlessly into carving out muscles, facial expressions or even minute textures reminiscent of skin pores or cloth weaves—all contributing towards realistic character models optimized for animation rigging later on.
Autodesk’s Premier Character Generation Tools
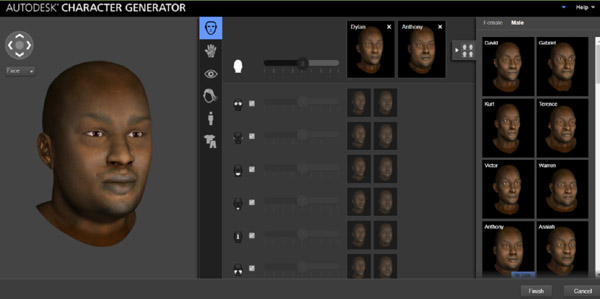
Autodesk Character Generator
Autodesk Character Generator is an online tool that allows you to skip traditional modeling from scratch by letting you pick a character from over 100 body types and physical attributes and customize it in a few steps, and download a fully rigged 3d model for further refinement and animation. It can be accessed as part of Maya or 3DSMAX.
Autodesk stands as the maestro of this high-tech symphony, offering tools like Maya and 3ds Max—gold standards in character generation. If you’re crafting characters for animations or setting scenes in virtual reality, understanding these programs is crucial.
Keep in mind that the following tools, while giving you much more freedom in your character creation, are often more time consuming and the learning curve for the software is longer if you are not familiar with it yet.
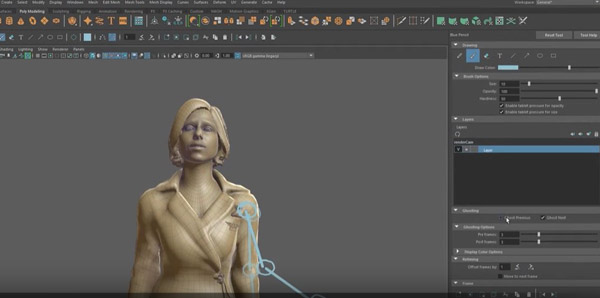
Maya – The Industry Standard for Animation and Rigging
The realm of animation rigging calls for a robust toolset—and Maya answers the call spectacularly. Known to be one of the most comprehensive character design software available, it gives life to poly-mesh figures through intuitive interfaces that professionals love. Whether you’re aiming to create detailed models optimized for movies or next-gen game characters, Maya offers an unmatched platform.
Artists turn to Maya because its animation capabilities are top-notch. Imagine having at your fingertips all the right brushes needed to paint high-resolution textures on your characters—that’s what using Maya feels like. It also helps animators give their creations realistic movements thanks to its advanced rigging features.
Motion graphics experts often regard it as essential; just ask any animator who has relied on its sophisticated skeletal structure implementation when creating animated masterpieces that wow audiences worldwide.
3ds Max – Streamlined Character Modeling and Texturing
If you think building intricate 3d character models should feel less like rocket science and more like artistry—then 3ds Max might just be your choice. This 3d software suite lets creators dive into modeling without getting tangled up in overly complex controls or esoteric techniques. It’s packed with enough power under the hood even seasoned pros will find something new each time they use it.
Conclusion
Embarking on the journey of 3D character creation, you’ve seen a spectrum from MakeHuman to ZBrush. The best 3D model character creators have been laid out for your next project.
Create realistic characters or fantastical beings; these tools are designed to cater to your imagination. From free trials to robust community support, each offers something unique. Click the following link to learn where to find 3d human anatomy models for free.
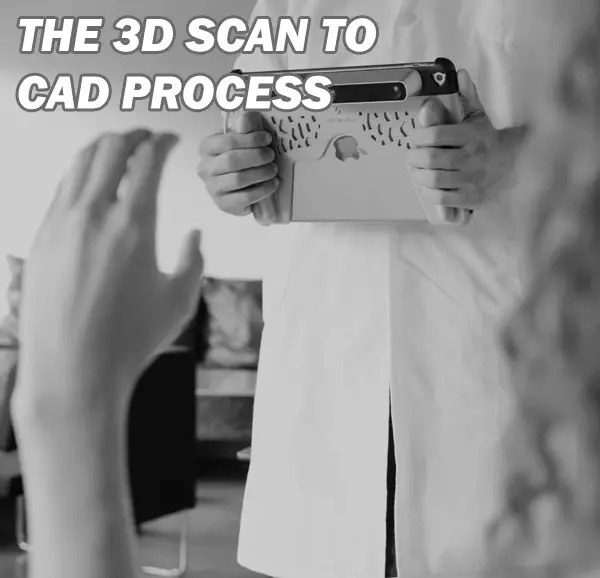
Decoding the 3D Scan to CAD Process for Reverse Engineering
When I first dipped my toes into the world of 3D design, 3d scan to CAD was like an alien language. It felt as though I’d stepped onto a foreign planet, full of complex parts and dense point clouds. I remember holding that handheld scanner for the first time – it was both intimidating and exhilarating. But with each scanned object, something magical happened: flat surfaces came alive in intricate detail; organic forms were captured with precision unseen by human eyes. Suddenly, reverse engineering wasn’t just possible – it became a thrilling journey from physical objects to digital reality.
In this article I will lead you towards more efficient and creative ways of working with 3D scans in CAD modeling. In medical device design/redesign and even medical animation, this is very useful.
The Magic of Reverse Engineering Software
Let us look at what makes reverse engineering special and extremely useful. The beauty lies not only in creating new designs but also retrofitting existing parts through reverse engineering—a vital part of building solid CAD (Computer-aided design) models today. Many industries use these techniques extensively because they make replication and variation creation faster compared to designing something entirely new every time—time is money after all.
Create Accurate Foundation For New Designs
-
Digital twins: With detailed 3D scans, we can create accurate digital twins of physical objects. These serve as a reliable reference for creating new designs.
-
Custom parts: Scan data usable in CAD software lets us easily modify the original design to fit our specific needs or constraints.
-
Improved workflow: By weaving the scan-to-CAD process into your existing workflows, you can cut down on time and boost efficiency. This integration helps to streamline operations, making things run more smoothly in the long haul.
Understanding the 3D Scan to CAD Process
The journey from a physical object to an editable, digital model in your preferred CAD software can seem daunting. But fear not. We’re here to break down the process and shed some light on how this magic happens digitally.
Digitizing Physical Objects with 3D Scanning
To start, you need a good quality scan of your existing object. Using a handheld 3D scanner, you’ll capture all the complex parts and organic surfaces of your subject into what’s known as point cloud data.
This raw scanner output acts like a very detailed distance meter for every surface geometry detail on your scanned object. The result? A dense blanket of points that accurately represent the shape and size of the original part – think of it as laying down dots over every contour until you have an accurate foundation for further work.
Making Scan Data Usable: Converting Point Clouds into Meshes
Once we’ve got our initial scans complete, there’s more work before we create CAD models from these captures. This next stage is about turning those billions (yes, often billions) of points captured by our trusty 3d scanner into something more manageable – usually triangles forming polygons or meshes.
A lot happens at this modeling stage; filling holes where scanning might have missed out details or creating surfaces over gaps where no data exists are just some examples.
Creating Your Final CAD Model: Reverse Engineering Software Magic
Now comes perhaps one of the most exciting parts—converting scan data usable within our chosen CAD software using reverse engineering tools such as Mesh2Surface for SOLIDWORKS.
This CAD reverse engineering process is where we transform our mesh into a solid CAD model. This transformation from scan-to-CAD software involves creating accurate and editable features that reflect the scanned object’s surface properties.
Adding Details and Refining the Design
In wrapping up this 3D scan to CAD short process outline, we focus on refining the minute details. It is essential to make sure all components are perfectly lined up, particularly if they form a larger assembly. Sometimes, tweaking is needed for an optimal fit.
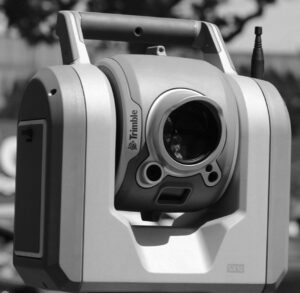
Techniques and Tools for 3D Scanning
From physical object to CAD model, 3D scanning provides the solution. Different scanners are used in various ways depending on the project.
Choosing the Right Scanning Tools for Your Project
The first step is choosing your weapon of choice – that’s right, your 3D scanner. It’s like picking out a new car: it needs to suit your style but also perform under pressure. Handheld scanners can be overwhelming because there’s so much to offer.
You need something versatile enough to capture complex parts with ease and precision. Consider this; if our task were scanning a tree (hello organic surfaces), would you use the same tools as when scanning say…an engine part? Probably not.
A key tip here is understanding what each scanner outputs before diving into purchase mode. Some spit out dense triangle mesh data in obj format while others prefer ply or stl mesh formats.
Best Practices for Scanning Complex Parts and Organic Surfaces
Navigating through this process isn’t just about having the right gear; it’s knowing how to use it too.
-
Ensure the scanner is positioned correctly relative to the object – not too near or far away, otherwise your scan results may appear like a work of art. Too close or too far, and your scan data could end up looking like abstract art.
-
Next, we ensure our scanning tools are properly calibrated. It’s kind of like tuning a guitar – you need to get it just right before you start playing.
-
We then commence with our 3D scans in sections, working methodically around each part of the object.
The best part is that digital technology can help us recreate existing parts. It’s like we’re turning back time.
Converting Scan Data into CAD Models
Scan data alone doesn’t give us editable features; we need help converting it into something usable like SolidWorks CAD entities or Autodesk Inventor surfaces. This is where reverse engineering software steps in. Using these tools allows engineers not just to recreate an exact copy but also to modify and improve upon scanned items without extra time designing from scratch.
The journey from 3D scan data to a final, usable solid CAD model might seem complex. But with the right approach and tools it becomes an efficient process.
Filling Holes and Repairing Meshes in Scan Data
Once you have your scanned object’s surface geometry represented as point cloud data, it’s time to convert this raw scanner output into something more manageable, like a mesh. That will finally be converted into solid, which is what CAD programs use. A common issue is holes in the mesh due to scanning limitations or complex parts of the physical objects being missed by the scanner.
To create accurate foundations for our CAD models, these gaps need fixing before moving onto any further steps. With advanced software filling holes can be done seamlessly – ensuring that we’re not just working on a blank canvas but one that accurately represents our existing object. This helps us get closer to creating solid CAD models from our scans – turning what was once simply visual information into editable features within our preferred CAD software environment.
Software such as SOLIDWORKS or RHINOCEROS include options to clean up scan data. SCANTO3D is a tool for SOLIDWORKS that has many helpful features for this process, it has wizards to help you go from a scanned point cloud to a mesh and to go from a mesh to a solid model which is needed for CAD (unlike just a hollow mesh for animation software like Maya). We want our solid model (click here for detailed definition) to be ready for use.
MeshLab is a free open source software that allows fixing of holes and converting it into a file type such as STL, which is a triangle mesh file used in 3D printing.
We also have tools such as Geomagic Design X at our disposal which help make scan data usable within preferred CAD software platforms like SolidWorks or Autodesk Inventor.
Speaking of other popular options in CAD modeling, Autodesk Inventor deserves a mention too. Known for its superior performance in creating mechanical designs, Autodesk is highly recommended by many professionals involved in product development due to its intuitive user interface and vast array of design capabilities.
Control Points and Surface Measurements: Creating Your Final CAD Model
In order to successfully reverse engineer existing parts or build new designs based on real-world objects, control points are highly recommended during this phase of converting scan data into usable form. These act as markers which guide how surfaces are shaped during the modeling stage of building your final CAD model.
But setting control points isn’t enough; software capturing accurate surface measurements also plays a critical role in developing high-quality CAD models. By meticulously recording each measurement down to even minute details such as fillets or small embossed text ensures nothing gets lost in translation when moving from physical world scanning towards digital design.
This is where the real power of scan-to-CAD software like SolidWorks CAD comes into play. They allow you to convert scanner data directly into CAD entities – making your reverse engineering or design process a lot more streamlined and accurate.
Case Studies on Successful Integration of Scan to CAD Workflow
Every industry, from aerospace to medical, can reap the benefits of a well-integrated scan-to-CAD workflow. Let’s take a deeper dive into some actual scenarios where businesses have efficiently used these technologies.
Enhancing CAD Workflow with Autodesk Inventor and Other Tools
The automotive industry has been quick to adopt 3D scanning and CAD software in their design processes. For instance, an auto parts manufacturer was faced with the challenge of reverse engineering complex parts for high-performance vehicles. Their goal? Create accurate CAD models that would allow them to enhance product performance while reducing production time.
This is where Autodesk Inventor, along with other scanning tools like Geomagic Design X, came into play. By combining the strengths of these powerful applications, they were able not only to capture every detail but also convert this data into editable features within their preferred CAD software.
The result? The final CAD model was so precise it felt as though you could almost hear the roar of its engine.
Filling Holes: A Construction Case Study
In another case study involving construction retrofit projects, often requires exact measurements which are hard if not impossible using traditional distance meters or tapes alone; enter 3D scanners. These devices captured highly detailed scans down to each millimeter, making scan data usable by architects in creating perfect-fit solutions for existing structures.
Solidifying Success with SolidWorks Plugin
The SolidWorks plugin allowed engineers to convert scan data into solid CAD entities seamlessly without losing any surface geometry details, building CAD models that fit like a glove.
The SolidWorks CAD process also saved them countless hours they would have otherwise spent measuring and drawing on a blank canvas. This case is an excellent demonstration of how scanning tools can enhance workflow efficiency in the construction industry, providing architects with an accurate foundation to work from.
FAQs
Can you scan an object into CAD?
Absolutely. 3D scanners capture the geometry of physical objects, creating a point cloud or mesh that can be converted into a CAD model.
How to convert 3D scan to 3D model?
You use software like SOLIDWORKS or Mesh2Surface plugin to turn your scanned data into precise, manipulable 3D models.
How do I import scan data into Solidworks?
To bring in your scanned info, open SOLIDWORKS and click ‘Open’. Select the file type for your scanning output then choose the desired file.
Can you 3D print from a scan?
Sure thing. Once an object is digitally captured with a scanner and converted into STL format, it’s ready for additive manufacturing – aka: “printing”.
Conclusion
Stepping into the world of 3d scan to CAD can feel like landing on an alien planet. But, as you’ve discovered, it’s a journey filled with discovery and innovation. The magic happens when we transform physical objects into precise digital models using 3D scanners. It opens up new avenues for reverse engineering that were once unthinkable.
Different scanning techniques offer unique advantages while software solutions help optimize scan data usability. Building accurate CAD models from this scanned data becomes our reality rather than starting from scratch each time.
The future? Expect more advances in 3D scanning technology making reverse engineering even more efficient and creative. Click the following link to learn how to 3D print from MRI or CT scans.
Discover Where to Find Human Anatomy 3D Models for Free Online
Picture this: you’re deep into a project, and you hit a snag – you need a human body 3d model, but your budget is tighter than the lid on grandma’s pickle jar. Well, guess what? I’ve been there too, rummaging through the depths of the internet to find human body 3d models for free. And today’s your lucky day because I’m about to spill all that hard-earned info.
We’re not just talking stick figures or vague outlines here. Imagine getting your hands on everything from muscle-bound heroes to meticulously detailed anatomical parts – without spending a dime.
Sit tight; we’re diving into places where creativity doesn’t have to cost an arm and leg—literally.
Exploring Free 3D Human Model Resources Online
Finding free 3D human models can be like hitting the jackpot for digital artists, animators, and scientists. It can save you a ton of time and literally a project.
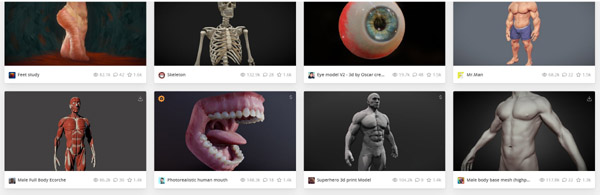
Turbosquid – A Treasure Trove of Free Models
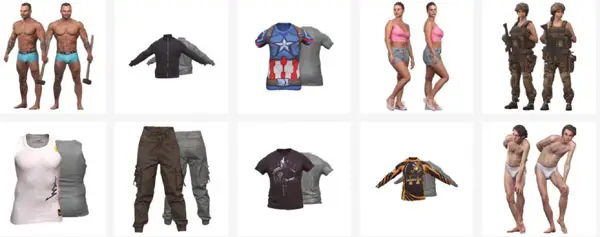
You might think quality comes with a price tag but Turbosquid flips that script. With an extensive library brimming with high-quality human body 3D models, this site is like walking into an all-you-can-download buffet. You’ll find everything from basic body basemeshes to more complex figures fully dressed in clothes. And if you’re thinking about creating the next great animated series or studying body anatomy, these assets are just what you need—no wallet required.
If you’re particularly keen on capturing realistic human features in your project, look no further than their ‘realistic white male’ offerings. Or perhaps it’s diversity that your scene needs; then dive into the range of ethnicities available at no cost whatsoever.
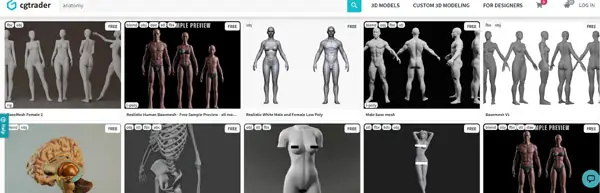
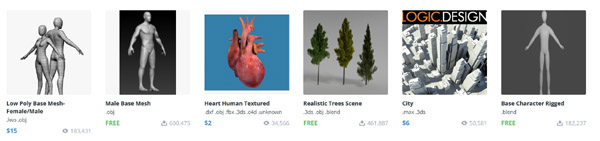
CG Trader – High Quality Anatomy Models
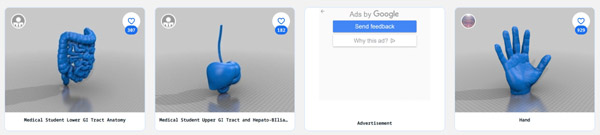
CG Trader has a section with really nice free 3D anatomy models, from stl to obj to fbx. You can find male, female, brain, body parts, eyes, skulls, skeletons, even higher resolution models. And if you cannot find exactly what you are looking for, the paid models are only a few dollars. We have come a long way from 3d anatomy models costing over $10,000.
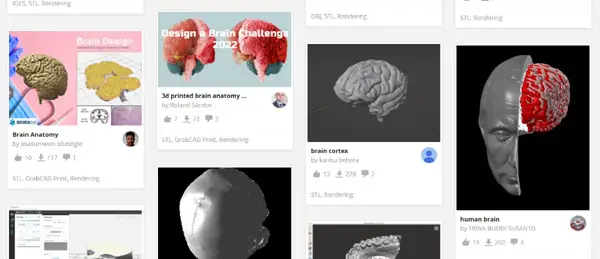
Sketchfab- Nice Collection of Anatomy Models
Sketchfab on its website includes a store of 3d models, both free and paid, that includes an extensive collection of 3d anatomy models, some of suprising quality.
Free3D – Diverse Collection at No Cost
As its name boldly states, Free3D opens doors to worlds unseen and stories untold without asking for anything in return—except maybe creativity. Whether it’s low-poly characters perfect for background scenes or high-poly masterpieces ready for close-ups, they’ve got it all covered. Their collection boasts not only diverse human figures but also specific parts such as heads and limbs complete with skin updates ensuring realism even up close.
A highlight here includes samples featuring different professions—from medical staff wearing scrubs to business men looking sharp in suits—a dream come true for those working on professional simulations or educational tools.
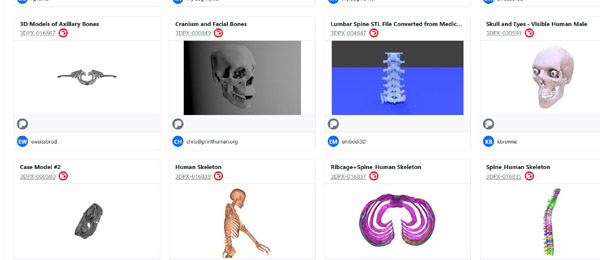
Grabcad – Engineering-Focused 3D Models
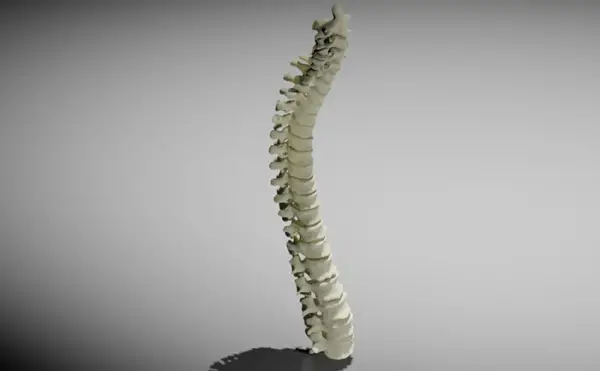
The beauty of Grabcad lies within its specificity; every model serves a purpose beyond mere aesthetics—it’s about functionality paired with detail-oriented design ideal for engineering projects. If intricate depictions of the human skeleton tickle your fancy or perhaps detailed studies of lumbar vertebrae call out to you then say hello to your new best friend: Grabcad’s library. These aren’t just any run-of-the-mill illustrations—they are carefully crafted representations aimed at helping engineers understand our very structure down to each vertebra.
NIH 3D
The National Institute of Health has a free anatomy models respository (NIH 3D) for use in animation, AR and VR. Make sure you abide by the usage policies and license types before using these models.
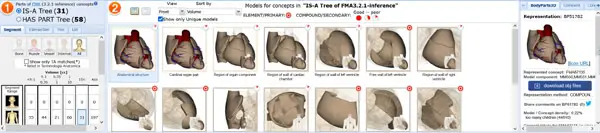
BodyParts3D
BodyParts3D is a Japanese repository of 3d anatomy models where you can piece together different systems from individual models based on your needs. Make sure you read their licensing information.
3D.SK
3D.SK is an artist anatomy resource site that has started adding anatomy 3d scans to their 2d offerings. Some of these are free and some include textures
Embodi3D
Embodi3d is a growing library of 3d anatomical models from scans. Many of them are free. They also have an online scan to model converter.
Thingiverse
Thingiverse was originally a user generated repository of models for 3d printing such as parts, but now has a section of anatomy models which you can use for various purposes.
Understanding the Variety in Human Body 3D Models
If you’re itching to get your hands on a human base mesh or are hunting for that perfect realistic human basemesh, there’s good news. The internet is bursting at the seams with free samples of every kind of human body 3D model imaginable.
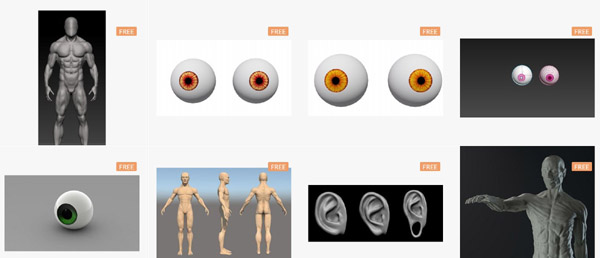
Realistic White Male and Female Base Meshes
Gone are the days when finding a quality male base mesh felt like searching for a needle in a haystack. Now, we’ve got options galore—from chiseled jawlines fit for an action hero to softer features more suited to everyday folks. And let’s not forget about female models, they’re all just clicks away.
You’ll also find sites teeming with body parts—a foot here, an ear there—perfect if you’re piecing together something specific or brushing up on anatomy without breaking out the scalpel.
Detailed Anatomy
Sometimes you need more than just skin deep—and that’s where anatomical accuracy enters stage left. Wanting nothing less than photorealism? You can snag yourself some seriously detailed brains, hearts ready for virtual bypass surgery—or maybe even some lumbar vertebrae if backs are your thing?
Incredible repositories like Grabcad step up as unsung heroes here; their libraries are stuffed full of intricate organ systems designed specifically for those who understand what ‘form follows function’ truly means.
The Bare Bones: Skeletons That Don’t Skimp On Detail
Bony frameworks waiting patiently for flesh aren’t hard to come by either. If it’s skeletons that tickle your fancy—you know, because sometimes muscle mass just gets in the way—the likes of skull ztl files stand ready at attention across various platforms. These skeletal marvels lay bare our inner architecture—with no fluff whatsoever—for all your educational endeavors or perhaps slightly macabre artistic expressions.
Eyes Without A Face… But With Plenty Of Realism
Eyes might be windows to souls but creating them digitally requires precision down to each iris fleck. Thankfully, modern graphic software gives us the tools we need. With careful attention and skillful use of these programs, artists can craft eyes that seem as deep and expressive as our own. This level of detail helps bring characters to life in games, movies, and other digital media.
FAQs
Where to find 3D human models?
Dig around on sites like Turbosquid, Free3D, and Grabcad, etc. They’ve got loads of free human figures up for grabs.
Is 3D anatomy free?
Yep, you can snag some solid 3D anatomy models without spending a dime at places like BioDigital or Zygote Body.
Is zygote body free?
Zygote Body offers a basic peek at human anatomy gratis. Shell out cash for the full-featured experience though.
How to create 3D human model?
Kick off with software like Blender or MakeHuman. Tweak your mesh until it looks lifelike.
Conclusion
So, you dove in and discovered where to find human body 3D models for free. You’ve got the know-how on snagging everything from a detailed skull to a dancing man model. Platforms like Turbosquid, Free3D, and Grabcad are your new go-to’s for anatomy art without spending a penny. Dig into these sites; they’re gold mines for students or pros needing that perfect body basemesh or realistic white male figure. Whether it’s about bones or muscles, high-poly glamor or low-poly practicality – you found it all.
Remember: great resources don’t always come with price tags. Your projects can now have depth and accuracy, thanks to those free sample previews of human 3d models waiting just clicks away.
Your toolkit is fuller today than yesterday; let this be what propels your work from good to breathtakingly lifelike. That search for where to find human body 3d models for free? Consider it over – now go create something amazing. Click the following link to learn what are the best websites to learn human anatomy.