
Baking is an essential process within 3D computer animation. MAYA is not the only program that utilizes the baking process. Other examples include Blender and 3D Studio Max. Most steps within MAYA will yield similar results in similar 3D modeling software.
The act of baking an animation creates a copy of the animation information, placing it into sequential keyframes. This process of establishing keys allows for dynamics operations, animations, or simulations to be frozen and locked to specific keys so that they may be easily copied or edited.
While the baking process is similar amongst 3D modeling software, the actual actions needed to be taken can differ from program to program. If you have questions on MAYA, look no further, we have the answers right here. Keep reading for a complete guide to baking animation in MAYA.
Words to Know
Before we dive into all of the technical goodies, here are some key terms that will help you navigate the guide to baking animation in MAYA:
| Baking: | Baking is the act of precomputing a specific texture (along with light and color information) or an animation sequence to create a new file. For animation, this creates individualized keyframes, and you can use it for precise adjustment. Both animation baking and texture baking can be used by animators to export files to other sources with their keyframes or lighting and shadows intact, respectively. |
| Channel:
|
Channels represent the specific attributes of an object that you can key onto an animation. These can be changed and affect things such as translations amongst the X, Y, and Z-axis, changes to object size, and rotation. |
| Channel Box: | Control tools where various channels can have their attributes quickly and efficiently edited. This tool allows for rapid changes in object animation. |
| Node: |
Nodes are the sets of various information and metadata on an object. MAYA recognizes and categorizes these nodes in three distinct ways. Shape nodes store where the control points are. The transform node records all of the movements and changes to the object. The creation node saves the original options used to generate the object. |
| Hierarchy? |
The arrangement of parent and child nodes and their relationships is the technical definition of a hierarchy. This process allows you to simply create a series of instructions to manipulate and create an object. |
| Driven Attributes: |
An animator sets more than one channels attributes to a specific key within the time slider taken and linked together. Creating driven attributes will eliminate the need to animate both attributes separately, automatically animating one when the other is animated. |
| Key: |
Keyframes (Keys for short) are the location markers of specific animation values at a given time. Essentially they are where an object is and what the animation is doing at a specific point in the animation. |
| NURBS: |
Non-uniform rational basis spline (NURBS) is a mathematical model used by artists and engineers to create curves and surfaces. Objects created using NURBS are often more accurate and can be simulated easier than their polygon counterparts. |
| UV: |
Two-dimensional coordinates on a polygonal object that are used in the mapping of textures. UVs aid the translation of 2D images onto a 3D shape, creating depth. |
Steps to Bake Basic Animations
- Select the objects, lights, and keys that you want to bake using the keyframe editor tool.
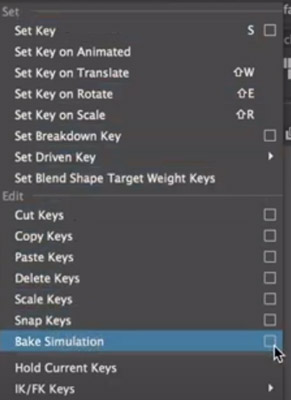
- Select the Edit submenu of Key and click the bake simulation option.
- Upon selecting the small box next to the option, you will be presented with a window to edit your simulation parameters.
- In the bake simulation options, choose to bake (which closes the window after running) or apply (leaving the bake simulation window open for further use.)
Despite this deceptively easy set of steps, a considerable amount of setup and creative work goes into baking an animation. Additionally, there are several other ways to bake an animation that allow for more customization and refinement of the process.
Options Within the Simulation Editor
There are many sub-options to choose from when exploring the options window for your given simulation. However, most users can generally disregard these sub-options. When doing more complex animations, these options may become necessary. Here we will discuss the various options and what editing them will do to a given animation.
Hierarchy Selection
First is the hierarchy selection that allows you to choose what objects will be set to the keyframes. You can toggle this option to select a group of items under the same parent group.
- Selected: will key only the selected object or objects. You can select objects from outside of the window with the manipulator tool.
- Below: Will key all animations of the selected objects and all those within the group beneath it in the hierarchy.
Channels Option
The channels option allows you to decide which specific animation curves are to be keyed. The channels option provides for a more specific simulation but can lead to errors if channels are not created properly.
- Channels: make specific channels that will be added by MAYA to the key set. Baking individual channels can make for more customization of multiple movements on the same key.
- All Keyable: This is the default and is always on. It makes it so ALL of the selected object’s animation curves are keyed on the simulation.
- From Channel Box: Keysets selected in the channel box window will be the only ones baked. You must ensure that you have curves chosen in the box, as it will default to selecting all of them.
- Driven Channels: Ensures that driven keys within the keyset are animated by the system on the same key. (This is set to off and requires advanced techniques)
Control Points
Control Points makes it so that all control points are animated. You can often see the control point option in a NURBS application (Non-Uniform Rational B- Spline) and their control vertices. In addition to NURBS, it locates any polygonal vertices.
Shapes
Shapes are the default parameter for the channel sub-option. It includes the animations for the selected object’s shape and transform nodes.
Time Range Selector
The time range selector selects how long a particular animation is to be baked and determines its size. This range determines the number of keyframes and results in increased render time for longer animations.
- Time Slider: The default option, it will animate the entire length of the scene. You can edit the time slider’s various parameters by entering the animation panel and changing the time slider options at the bottom.
- Start/End: For use when you want only a specific amount of time to receive the baking treatment. The start time and end time options are greyed out and unavailable until this is selected.
- Start Time: The location on the time slider where the baking process begins.
- End Time: Where the baking process halts.
Baking
“Bake to” allows you to decide what layers MAYA will bake and where to place the results. Base animation is the default and will put the products on your current layer. A new layer makes the baked results appear on a new layer, with anything unbaked left uncopied.
The baked layers option has a dropdown menu providing opportunities for various attributes to be manipulated by you.
- Keep: This option makes all of the object’s attributes stay on the layer.
- Remove Attributes: All of the selected attributes are removed from the animation layers when baked.
- Clear Animation: Animation and keys are removed by the system automatically from the source layers
Sample By
Sample By allows you to edit how often the baking process keys the frames into the time slider. By default, this feature is set by the options to every one frame; however, you can change it to your desired frames here. You can use the tool to fit frame rate specifications or to allow more refined control of movements.
Smart Bake
Smart Bake puts a limit on how many keyframes you bake. This option ensures that the keys are set only at times where the animation curves have a keyframe.

Smart bake helps reduce render times by cutting out redundant keyframes when an animation is idle. It is not particularly useful in most cases and is only for those who want to keep the keys simplified.
Increase Fidelity
Increase fidelity is only available when smart bake is on and functions to add keyframes to the baked result based on your chosen tolerance.
Fidelity Key Tolerance
This tool allows MAYA to add extra keyframes depending on the animation curves present. Depending on the percentage set, the system decides to add additional keyframes, increasing the animation’s smoothness and fidelity.
The lower the key tolerance is, the more keyframes added, with higher tolerances having fewer keyframes. Higher tolerance will allow your result to differentiate more.
Keep Unbaked Keys
Keep unbaked keys will keep the animation that is not within the set time range. When off, the keys outside of the set range will not be present in the baked animation. This option is on by default.
Sparse Curve Bake
Sparse Curve Bake lowers the number of curves you bake during processing, only producing enough keys to represent the original curve. This process only works on the curves that are directly connected.
Disable Implicit Control
Disable implicit control removes the ability to manipulate controls and handles after the process.
Unroll Rotation
Unroll rotation is mostly used by game and film creators in motion capture makes sure that movements cannot exceed 180 degrees of movement between keyframes. This option limits the animation if the capture spaces keys by more than 180 degrees apart.
Baking Inverse Kinematics
Inverse Kinematics or IK is the process of reversing the order in which a hierarchy follows its commands. This feature is used by animators to create more fluid animations as Forward Kinematics (FK) force the entire object to follow its parent command.
Using FK for moving bodies atop a stationary form often results in less fluid and nonsensical animations. Utilizing IK can make the process easier for animators.
You can take Large groups of objects that you can then animate by manipulating a single parent. The use of IK results in a figure being static in some locations while still having independent motion.
A simple example of the use for IK is when placing a character’s foot or leg but allowing for movement of the knees.
When you edit a figure’s hips by moving a parent in the hierarchy, it does not impact the entire leg and foot; instead, the feet stay planted, and the knees bend. By doing animations in this way, they end up looking much more realistic to the human eye.
The process of baking using Inverse Kinematics is simple and utilizes a similar process depending on your need.
- Select the joint and parent hierarchy desired.
- Select the key menu and click on the baking simulation submenu
- Check the disable implicit control box.
- Bake
What is Animation Baking?
The act of baking an animation runs an animation sequence and creates a copy of an object’s movements.
By baking an animation, you can achieve high-quality effects without requiring the computer to render it. An animator’s framing was done by an artist ahead of time, leading to a lesser load on the system. This can also allow for files to be transported between various pieces of software.
Using both simulation and functional processes, baking your animation can save load and render times further down the line. Creating keyed frames for an animation, rather than flowing between more spaced out keyframes, allows the movements to be the same every time.
Due to the inherent randomness brought in by animation, baking an animation layer or key is essential to creating a polished and reliable output.
Baking Animation in the Medical Animation Field
This process has found its niche in the medical animation field where there is a distinct need for motion to be baked to save on rendering time. While the process may seem counterintuitive, creating extra keys when the animation is fluid enough serves a vital function. At the same time, the baking process may initially take more time with rendering the second time.
Every time after that, it will play out faster and to the exact specifications. This conservation of memory is accomplished by reading the baked animation file and memory instead of rendering it thoroughly each time.
You can also bake visual effects using the same process. This allows for things such as smoke, liquids, or particle effects to be pre-rendered. This is especially useful when you are using complex shaders and lights. There is a steep level of rendering time needed to produce more complex animations the can cost you time. This is important for biological dynamics and particle effects simulations that cannot be animated manually by hand, and have to start with a powerful but less controllable simulation.
In the event that you do not bake your animations, you will find difficulties in loading files at a later point. The mistake of not transferring your nodes to keyframes can also result in a file not being read by other programs. Baking animations is a simple yet vital part of the process that cannot be ignored as you scale up your projects.
Exporting an Animation Layer
When exporting a particular animation for Unity or similar programs, the animation layer can be baked by the computer immediately upon export. This feature can save time and provides a crucial step for using the file with any animation.
An unbaked file does not have the nodes determined and locked to keyframes, making it often not work with other programs.
Suppose more finely tuned animation baking is required. In that case, it is not recommended by professionals to bake upon export as doing so uses the default settings.
The best use for this process is to create something with Inverse Kinematics or to bake at different intervals. In that case, I recommend baking your animation ahead of time. You can do this by referring to the directions at the beginning of this guide.
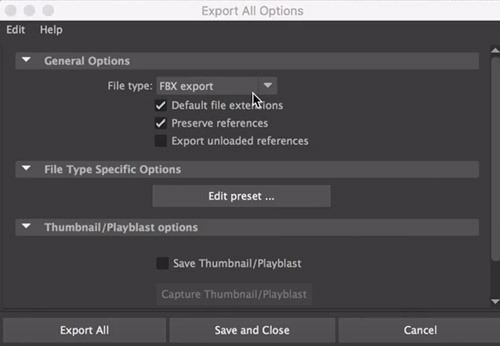
The actual process of exporting a MAYA animation to FBX for further use is relatively simple.
- Go to file and then export selection, choosing FBX as the file type, or go, game exporter, if your version of MAYA allows for it (this will automatically use an FBX file)
- MAYA will present you with a prompt with several options for exporting your file. Most of these are self-explanatory and are commonly left alone unless required for specific circumstances.
- Suppose you are choosing to bake upon export. In that case, the submenu is in the location, and you should be toggling it before exporting.
FBX Files
There are a number of programs that will read the FBX file, which stands for filmbox, and even a few that allow for direct manipulation of the animation. These programs include the following:
- Unity: A cross platform game engine that is used by many developers to create applications for PC and Mac. Unity cannot accept the animation files without them first being baked, as importing a regular MAYA file will just result in the objects being brought over.
- Autodesk Auto CAD: Computer-Aided Design (CAD) software made by the same developers as MAYA. AutoCAD is used primarily for engineering, design, or manufacturing processes and offers robust simulation and 3D printing software.
- Unreal Engine: 2D and 3D animation software created by Epic for use with game and simulation development.
- Mudbox: A program used primarily for sculpting 3D objects and baking textures into files. This is used in animation to mostly fix an error or to create UV mesh to go atop an object.
Examples of Baked Animations
Any animation used in a loop or for the purpose of fine-tuning down to the specific frame will use baking techniques.
Walking and idle animations are often used, frequently acting as a baseline for a character or object. Having these pre-made permits them to be interrupted at any keyframe allowing for a smoother transition between actions.
Baking your animations is essential for any application used for the creation of video games. For example, Unity’s programming suite is popular with mostly independent developers. It requires the keys to be set for Unity ahead of time.
The requirement to have keys is because MAYA utilizes nodes and a hierarchy that does not translate well to other programs easily.
What Types of Animation are Supported by MAYA?
There are many different animating methods in MAYA that will affect your workflow and determine the parameters that you can edit. The most common techniques for animating are keyframe animation, nonlinear animation, importing of motion capture files, and layered animation.
- Keyframe Animation: The most common application of MAYA’s animation capabilities, keyframe animation, lets you move the objects of your animation in time by setting keyframes on a timeline.
- Nonlinear animation: Lets you use various clips of animation in any order allowing for you to achieve new effects. Nonlinear animation is most common in looping animations such as a walk cycle or idle stance that repeats.
- Motion Capture: Maya has the ability to accept data from a motion capture session. This allows for believable and dynamic motion that can have a large impact.
- Layered Animation- Saving your animation into layers can improve workflow and productivity. The layered animation choice lets you combine and change motions on a large scale.
- Path Animation: Sets the object to move upon a predetermined curve. This style of animation makes it so the object follows the curve the same each time.
- Dynamic Animation: Utilizing dynamic animation allows you to create things with natural effects. The effects created by this style are subject to the forces of nature, such as gravity or conservation of energy (Ex. things falling or bouncing off vessel walls)
No matter how you choose to animate, you can bake all of the products into simple keyframes for export or minute adjustment. It is imperative to acknowledge the various animation styles as some excel in ways others do not.
Here is a good video by Autodesk on baking and exporting animation :
Texture Baking in Maya
While an animator can bake animations to create a modifiable, faster rendering output, you can bake textures to aid in the rendering and animation process as well.
Baking textures allows you to place them on a set of UV coordinates rather than rendering them in real-time which can lead to unexpected results.
Artists primarily use this to save the colors, reflections, and shadows cast by lights in a scene. Baking a texture map can be used to be later added onto objects. It saves on workflow, allowing animators and artists to share files more easily. It also saves on computing power, doing the initial work ahead of time, and not during final rendering.
The steps to baking a texture in MAYA are similar to baking animation, with the user interface changing between the two modes.
- Open the windows sub-menu, selecting Material/Texture baking editor, and finally, texture baking settings.
- Opening up the settings window allows the various settings to be adjusted, with minimal sample rate being at least 0 and max at least a value of 2.
Final Thoughts
The act of baking can turn relatively complex animations into much more simple and easy to manage files. It is a vital component of creating smooth and well-defined animations. The consistency of the simulation when an animation is baked allows for other aspects to be freely worked on. It is vital for you and any other animator to learn these basic steps to create more efficient animations.
The animation of 3D objects is a complex and often underappreciated art that comes with many challenges. One of these challenges is the flexibility of various aspects of a given simulation. When aspects such as collision and gravity come into play, there can be many possible outcomes.
When you bake things down and specify their various keyframes, you ensure that the finished product is the same every time. This constant result can become the linchpin of realistic animation.
Click the following link to learn the difference between trax editor and time editor.
Recent Posts
Mastering point cloud to 3d model conversion can feel like translating whispers from another dimension into vivid sculptures. You've got this cloud of data points, a chaotic concert of coordinates...
Let's say you've got a drawing, something you sketched out during a burst of inspiration, and now you're itching to see it leap off the page into three dimensions. Well, that’s exactly what I did...