
Weight painting is a clever way to apply weight information to your model smoothly in a pretty intuitive way in order to rig a 3d mesh.
But why is weight painting difficult? Read more to find out why and the solutions to this.
Weight painting can be difficult for a number of reasons including not understanding the basic concept, having many weighted influences affecting a model, using automated weighting unsuccessfully, not having enough practice, and experiencing software errors. Let’s discuss and see how to make it less difficult.
Some of the difficulties you may encounter during the process of weight painting include:
Difficulties in Maya
Despite being one of the most used 3D animation software globally, Maya has a complex toolset.
If it’s your first time working with this software, you might be overwhelmed with the learning curve and spend more time looking for information than actually doing your project.
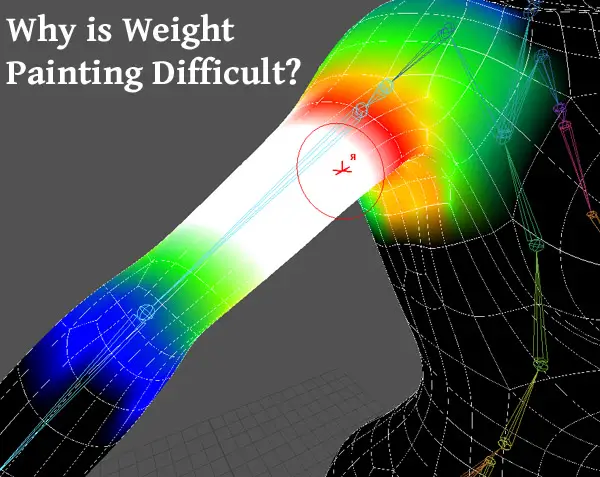
Another challenging part of using Maya for weight painting is that it requires a user to assign weights to every vertex manually. This process takes time and is prone to errors.
The best way to go around this challenge is;
Difficulties in Blender
Although Blender is a powerful tool that you can use to create 3D animations and objects, it is also known for being complicated to use.
The learning curve is so steep that many people avoid using it altogether.
Depending on the video card you use on your computer, Blender may present several challenges such as
- A black stripe on models – This typically happens when normals for one of the faces point in the wrong direction. You can solve this by having the blender recalculate the normals.
- Hidden objects – Some images may not show up in your 3D view. If you accidentally press H while searching for another key, you will hide the selected object. To solve this, press Alt+H
Default weights not working
Default weights are a set of weights that can be used to quickly and easily create a new character. All the vertices and faces of the character can be created by painting their colors and adjusting their weights. The default weight is applied when there are vertices in the model with no weights or insufficient weights to correctly define all vertices in the object.
A default weight failure in weight painting occurs when there is no weight defined on any faces or vertices in an object, causing an incorrect surface to be generated when it gets exported.
In the weight painting process, default weights should be applied to the skin, hair, and eyes. But if you have a specific goal in mind for your character’s skin weighting, you have to select all the other bones in the body and clear the default weights before painting them.
There is a way to fix this by applying a new set of default weights which depending on the software can be done with a script.
This script will scan through your mesh automatically and change any bone whose weight is set to “default,” which means it has been cleared from painting by someone else.
Glitches in software
Glitches happen when a program malfunctions and fails to work correctly.
These glitches can be caused by;
- Trying to save a file in a different format, like PNG instead of JPG, and save it with an extension that is not compatible with your device.
- Using different software on an incompatible operating system
- Using the brush resize tool to change the size of the brush in the wrong way
In all honesty, in programs like Maya weight painting may crash the program for any number of unknown reasons out of nowhere
Many possible solutions are available if you need to fix your weight painting issue, such as saving in another format or using another software compatible with your operating system.
To make your weight painting experience pleasant, try these solutions:
1. Proper 3D mesh for animation
Make sure that the mesh is clean, not too heavy, no intersections, no holes.
2. Correct joint placement
It is essential to know how to use joint placement properly for your object to be weighted correctly. If joints are not placed perfectly, they will not be taken into account by the paint system, resulting in incorrect weights.
To properly place the joints in Maya;
Select joint name from paint “skin weights tool.”
Right-click the joint you want to paint, then select influence in the marking menu
Drag across the skin. The joint influences painted vertices in relation to other joints.
3. Correct density in areas of deformation
The correct density in weight painting can be found by how closely the painted strokes are together. If they are too far apart, then it looks airy or feathery and will take up too much surface area on your object. It will be difficult to see what you have painted and look sloppy and unprofessional if they are too close.
Correct density ensures that there are no holes in the mesh due to inconsistent thicknesses.
To be used as a reference for the density of a given area in an image, the user will first need to paint a weight map. The color should represent how dense the pixels within this area should be.
Different areas of an image may have different densities, for example:
- A black and white image or a line drawing that has no shading will have a uniform density
- Areas with conspicuously higher contrast may need higher densities to prevent the lines from appearing too thin due to insufficient contrast.
If you have a brush node with node path A to B, Node Path A is set to 100% opacity, and Node Path B is set to 50% opacity. When this brush node moves from point A to point B on your mesh, a stroke begins at 100% opacity and gradually fades out at 50% transparency.
If you want this stroke to be more even or gradual, you can adjust the Density value by going into the properties window and changing the value from 0.0 to 1.0, making it so that your brush will have no deformation weight painting.
4. Even spans
Even spans in your model will make sure that the weight painting process goes as smoothly as possible and doesnt run into unnecessary issues performing the calculations which are complex behind the scenes of the intuitive process.
5. Start with rigid
If you are having problems you can make your weight equal 1 on each joint to begin with and then knowing what you started with add other weights.
6. Practice
To get proficient at weight painting and get over the fear, complete a dozen skinnings of characters, including higher resolution ones. Remember that practice makes perfect.
Here is a lesson on how to paint weights effectively in Maya:
Conclusion
Despite its benefits, the process of weight painting is not always straightforward and may seem like a daunting task with lots of trial and error.
You can use existing software to create weight-painting, but it requires human intervention and manual labor.
Click the following link to learn what 3d rigging is and why its important
Recent Posts
Mastering point cloud to 3d model conversion can feel like translating whispers from another dimension into vivid sculptures. You've got this cloud of data points, a chaotic concert of coordinates...
Let's say you've got a drawing, something you sketched out during a burst of inspiration, and now you're itching to see it leap off the page into three dimensions. Well, that’s exactly what I did...